
User Guide
A friendly, step-by-step walkthrough of UltraVoice — written for everyone, no technical background needed. We'll create an AI voice agent, give it a voice and knowledge, test it, put it on a real phone number with Twilio, and then set up a full Call Center where live calls can be handed to human agents and watched by a team leader in real time.
Everything happens at ultravoice.us.inc.
New here? A great first goal: create an agent, write a clear system prompt, add your provider keys, open Voice Test, and have a real conversation with it — about 20 minutes. New accounts start with free credit to try it out.
Part 1 — Get started
1 · Create your account
Everything starts with a free account at ultravoice.us.inc.
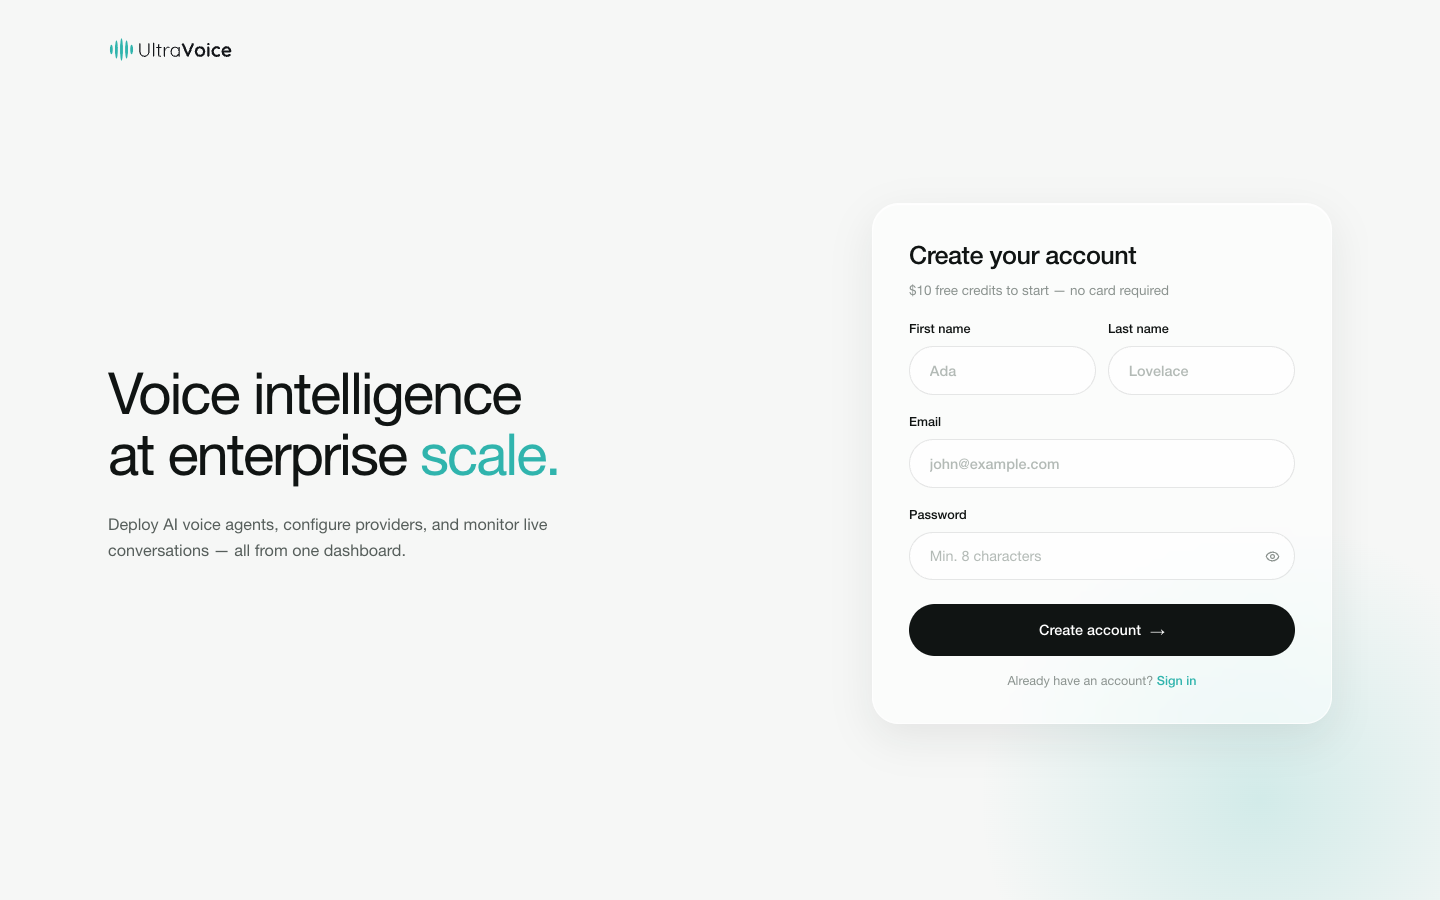
- Open the sign-up page and enter your first and last name, a work email, and a password (at least 8 characters).
- Press Create account — we'll email you a short verification code.
- Type the 6-digit code on the next screen to confirm your email, and you're in.
2 · The welcome tour
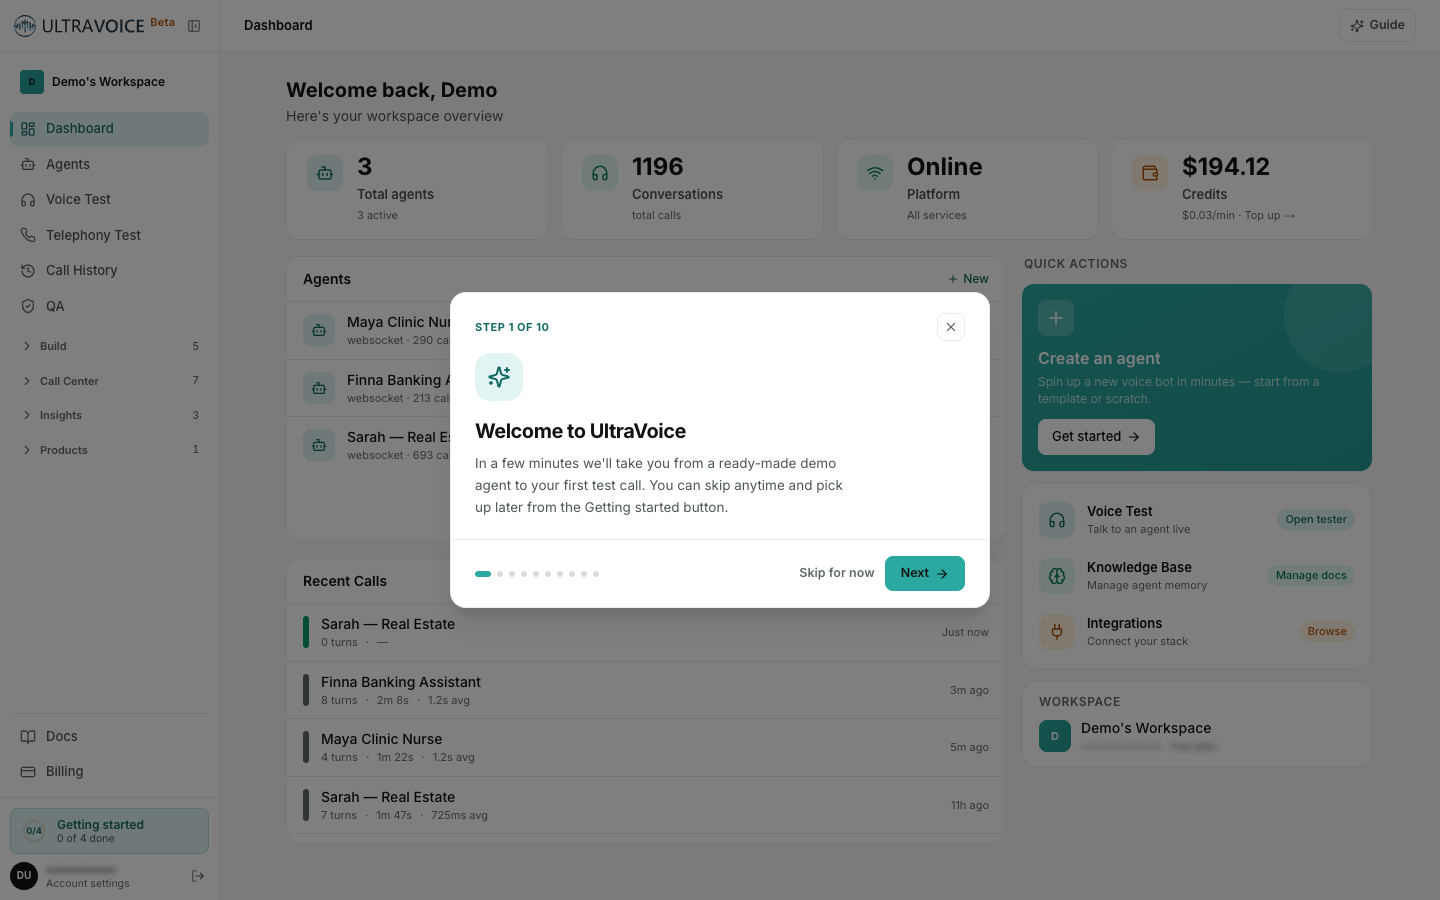
The very first time you land on your dashboard, a short welcome wizard walks you through the essentials step by step — meet your ready-made demo agents, add credentials, run a test call, and go live. You can Skip for now at any point and reopen it later from Getting started.
3 · Sign in
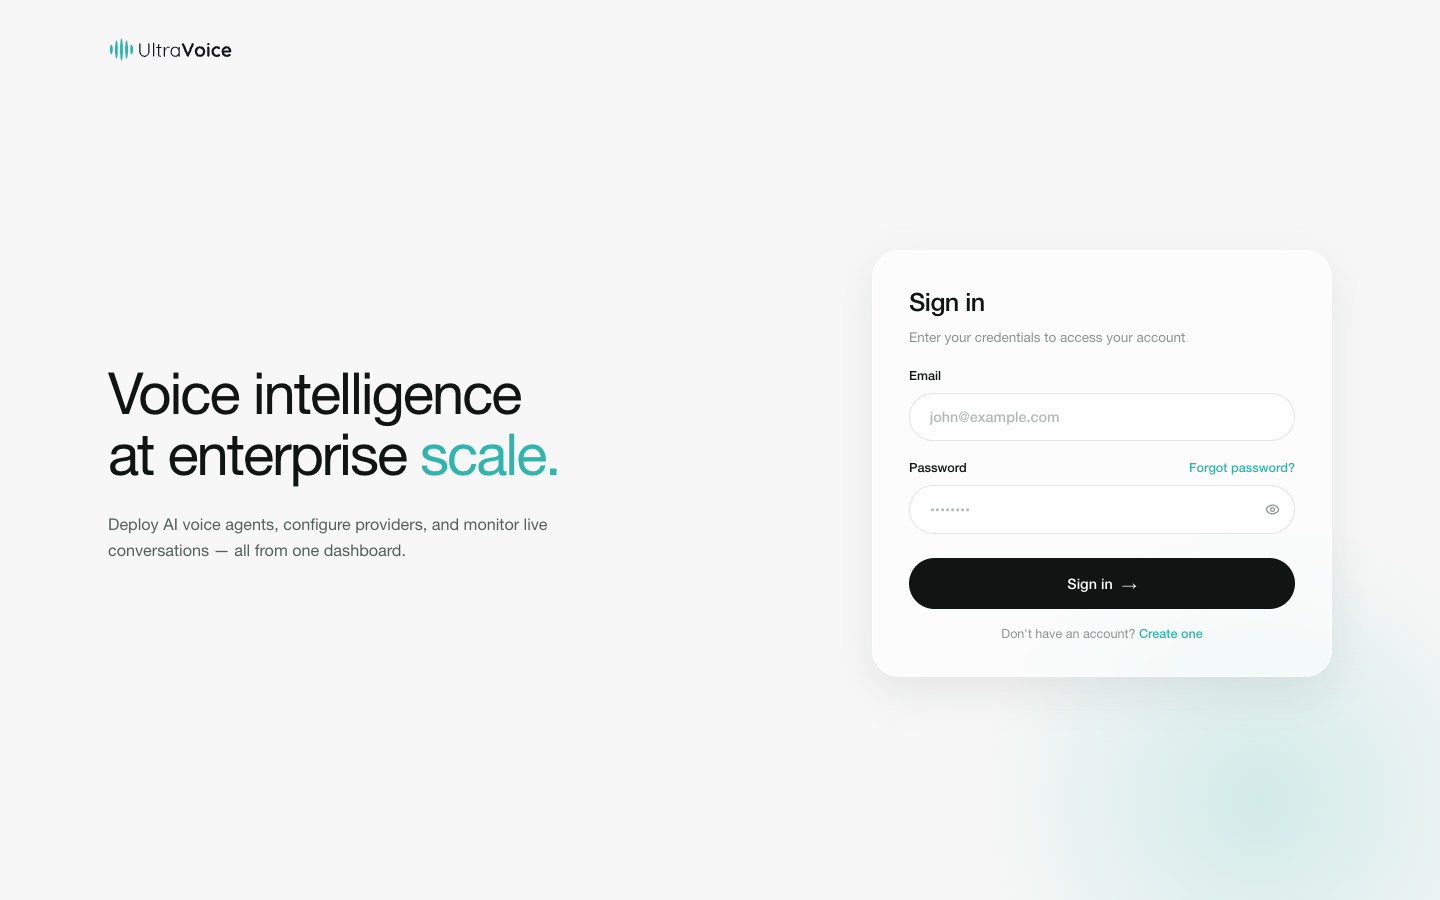
Returning users land on the sign-in page — enter your email and password to open your workspace. Forgot it? Use Forgot password? to reset by email.
4 · The dashboard
Your home base. At a glance you see how many agents you have, how many conversations have happened, your platform status, and your remaining credit.
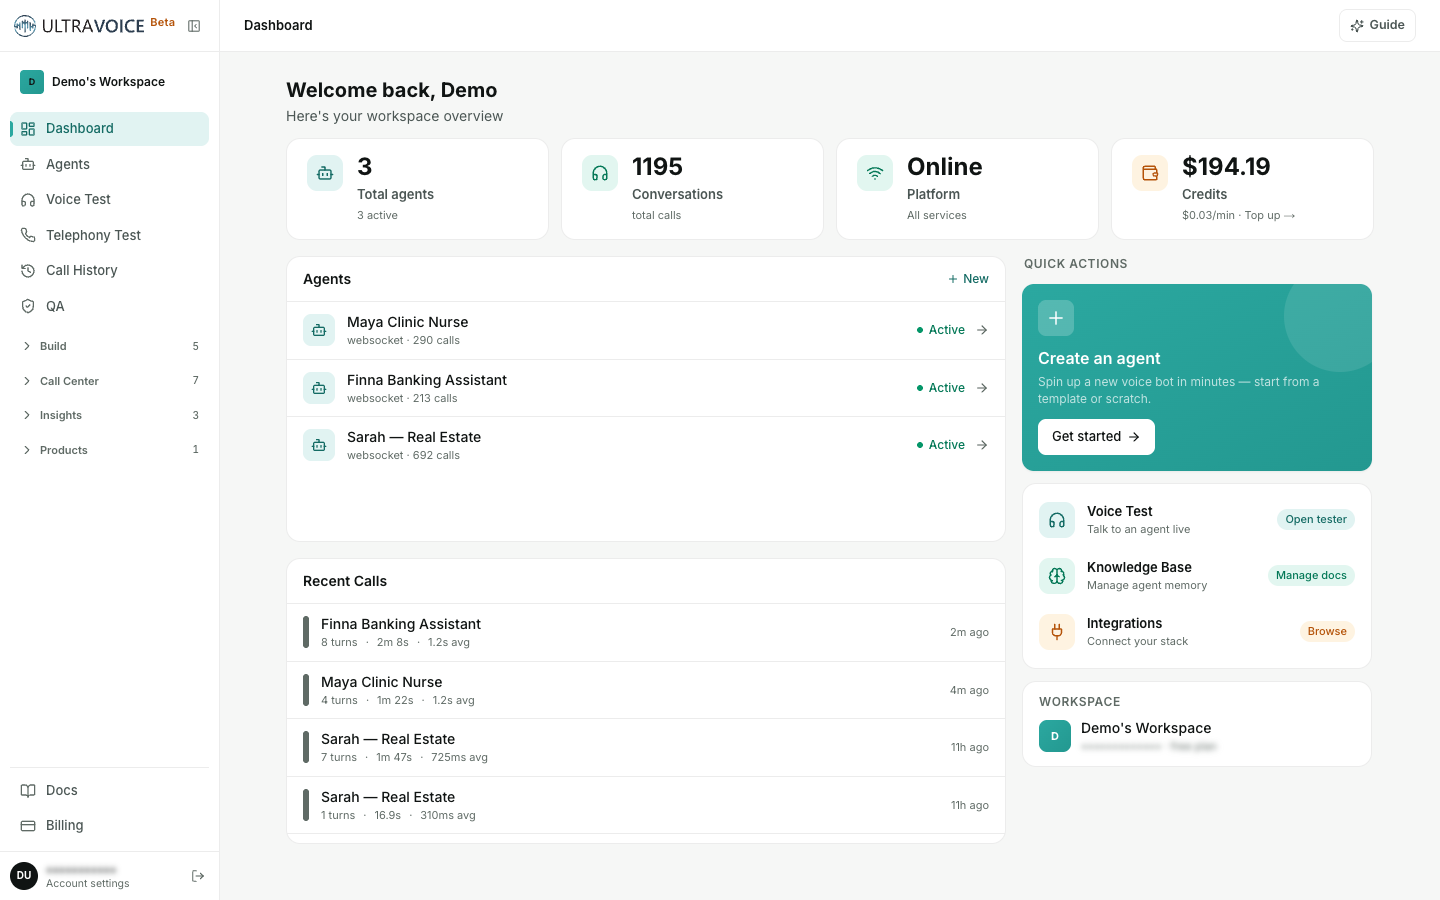
- Top cards — total agents, total conversations, platform status, and wallet balance.
- Agents list — every agent with its status and call count. Click one to open it.
- Quick Actions (right) — shortcuts to create an agent, open Voice Test, or manage knowledge.
- Left sidebar — your main menu, grouped into Build, Call Center, Insights, and Products, with Dashboard, Agents, Voice Test, Telephony Test, Call History, and QA pinned at the top. It stays with you everywhere.
Part 2 — Build your agent
Think of each agent as one "employee" with a specific role — a support rep, a scheduler, a salesperson. Your workspace comes pre-loaded with three working demo agents so you're never staring at a blank screen.
5 · Your agents
The Agents page lists every voice agent you've built.
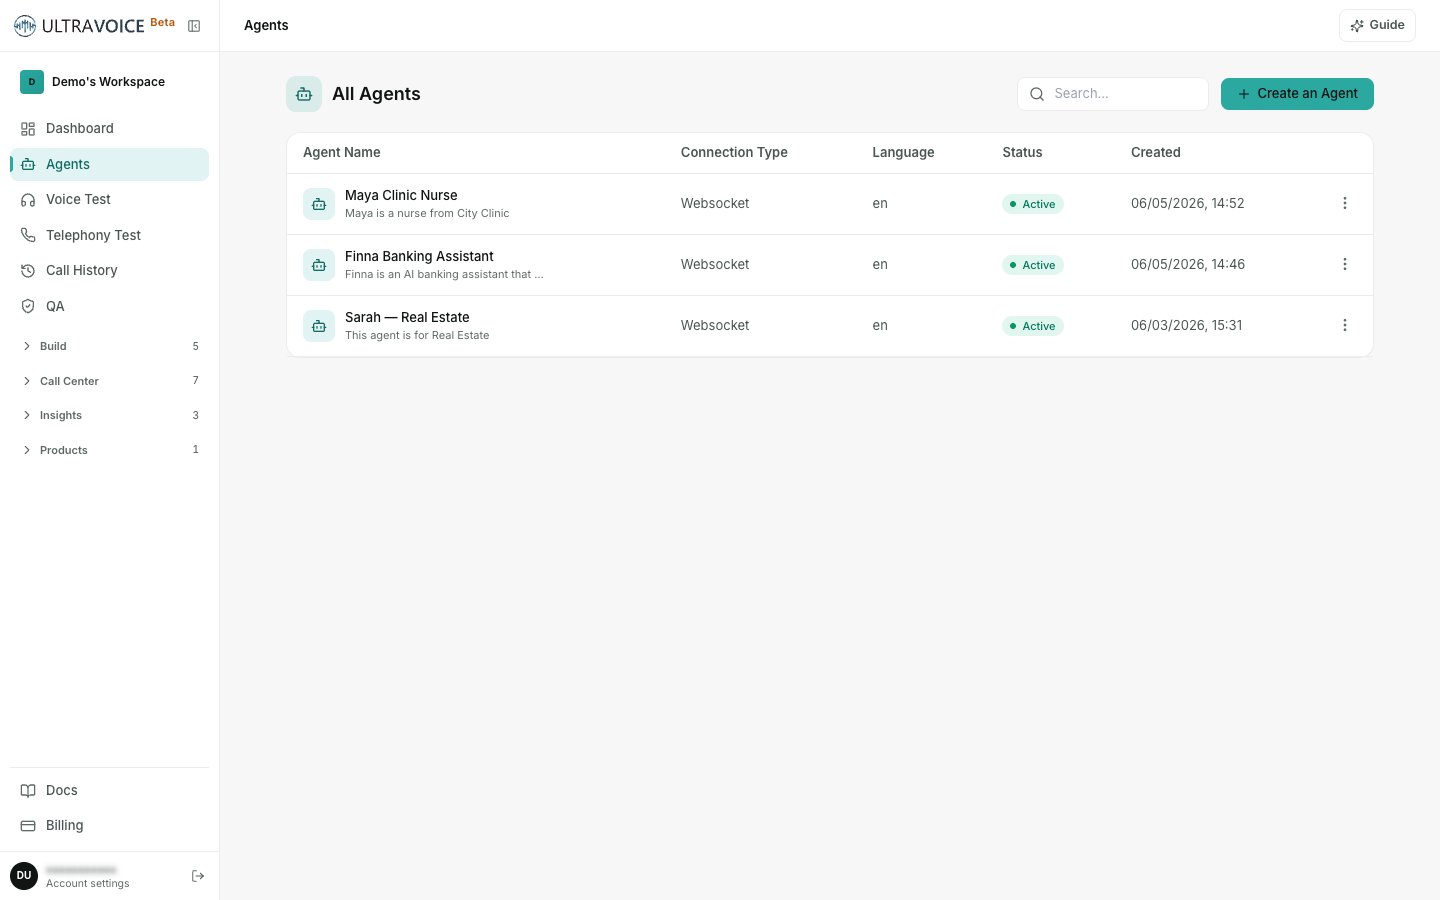
- Click any row to open and edit an agent.
- Use Create an Agent to build a new one.
- The Active badge means the agent is published and ready to take calls.
6 · Create & configure
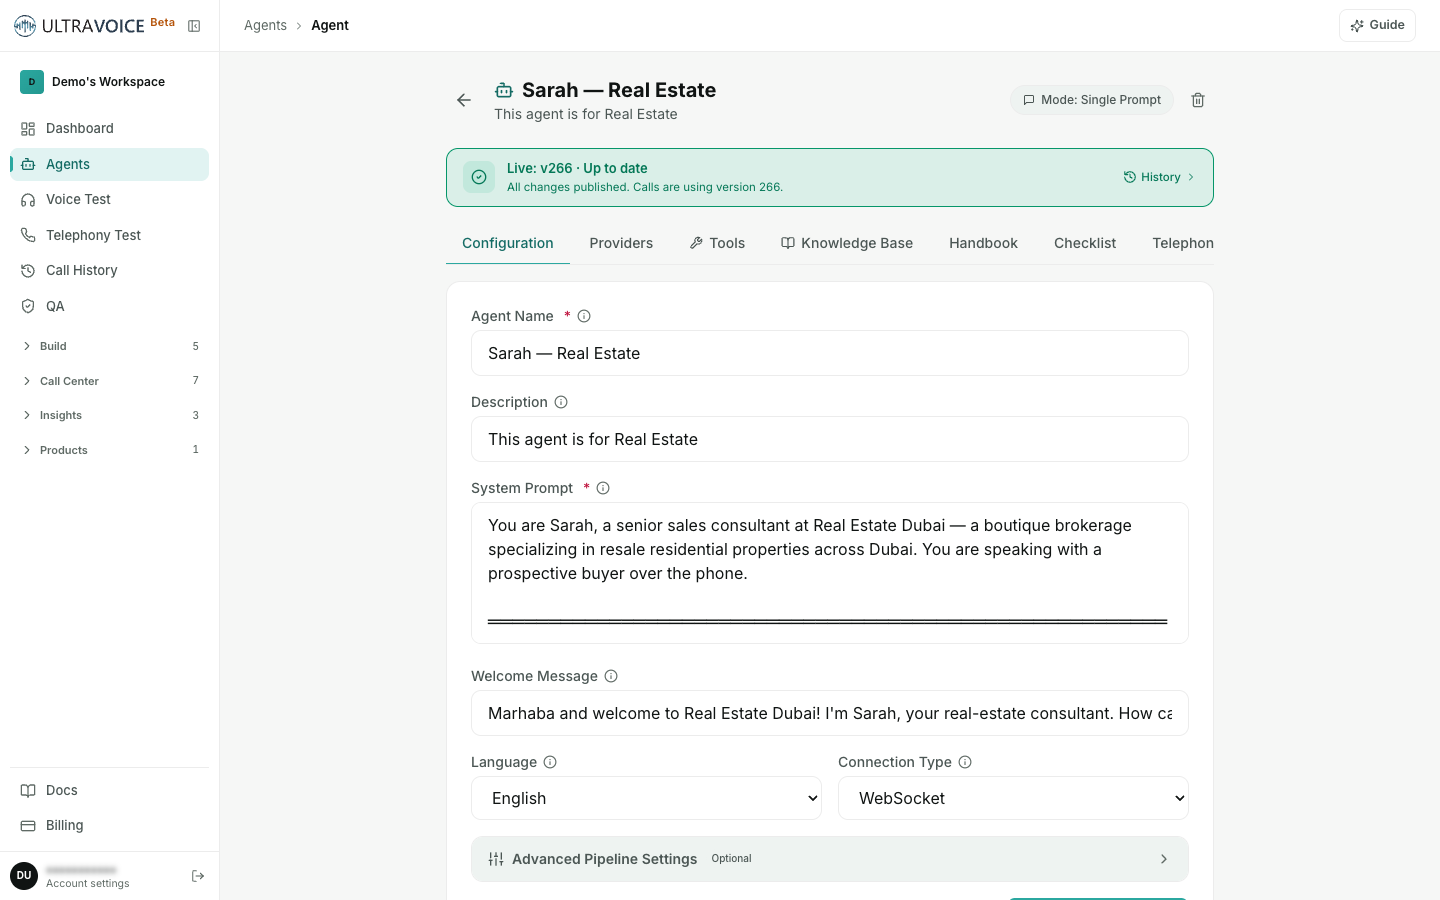
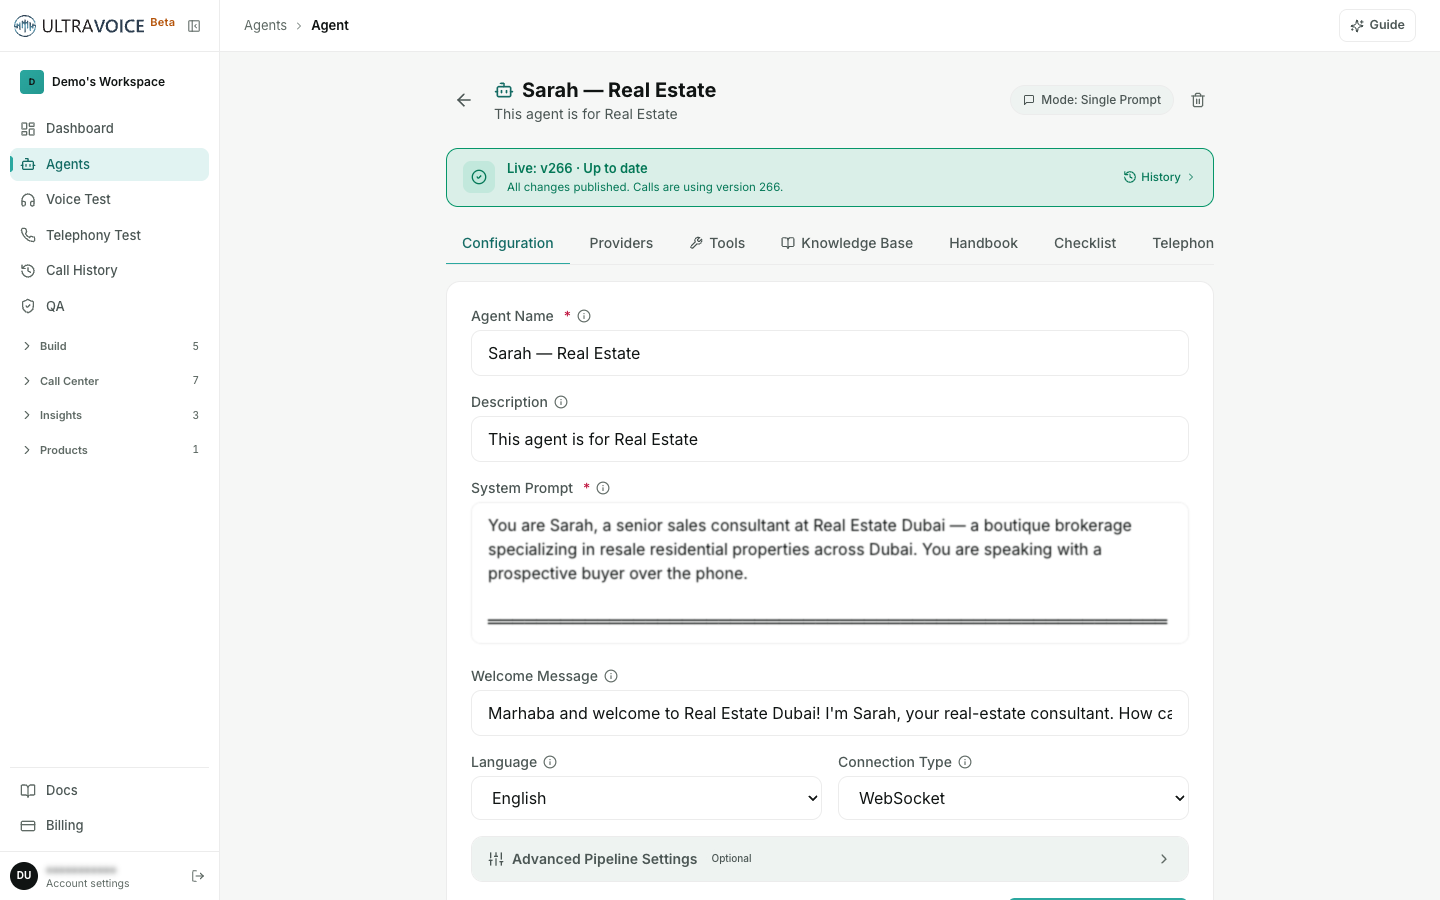
Open an agent (or click Create an Agent) to reach its editor. The tabs across the top — Configuration · Providers · Tools · Knowledge Base · Handbook · Checklist · Telephony · Flow Builder · Tests · Analysis · History — let you fine-tune everything.
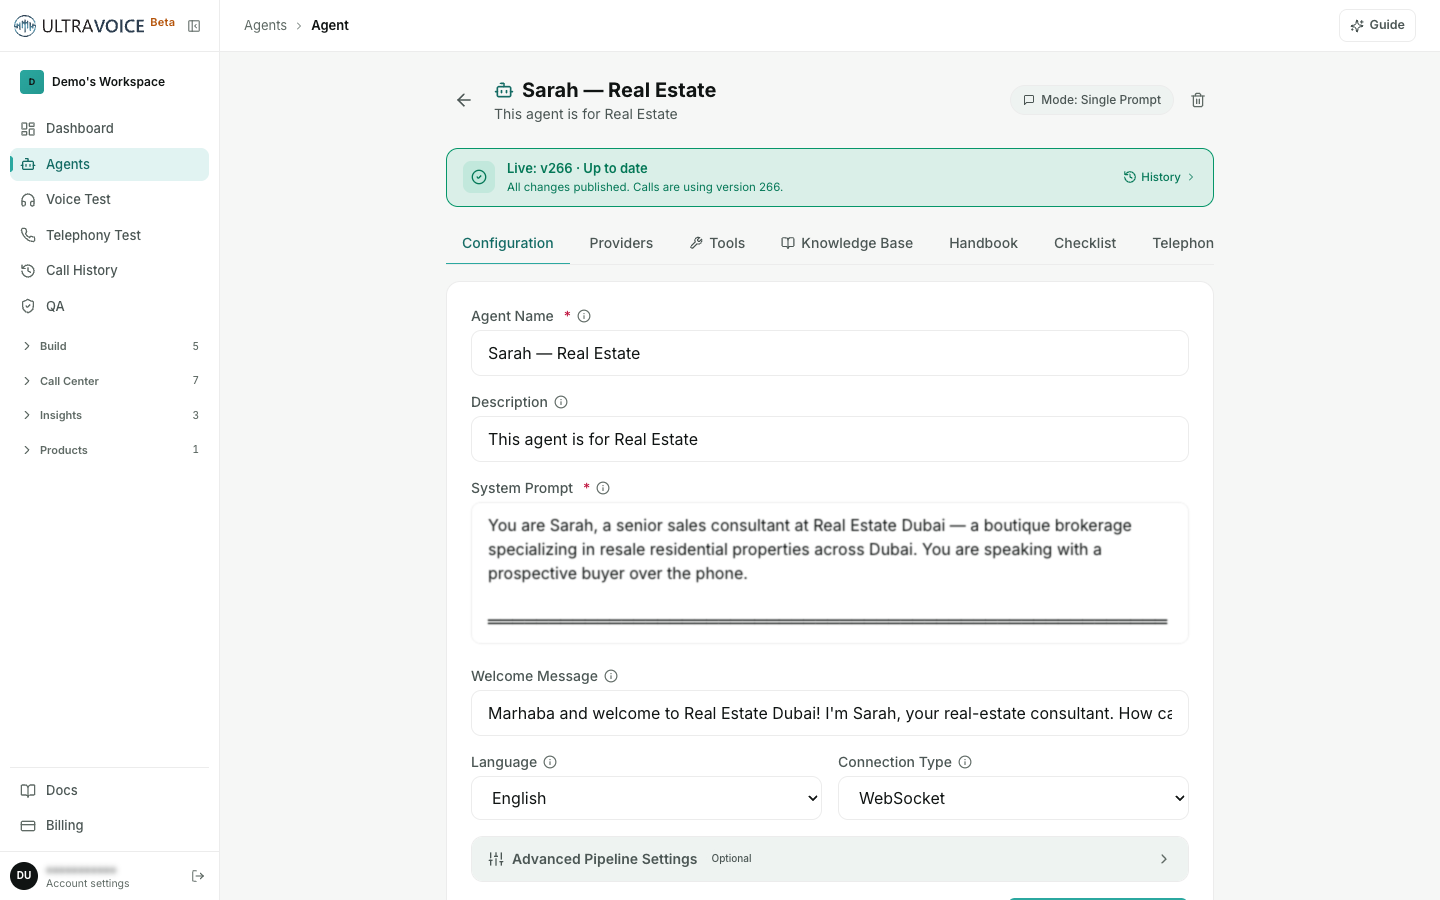
On the Configuration tab:
- Agent Name — something memorable, e.g. "Front-desk Booking Bot".
- Description — a short note for your own reference.
- System Prompt — the most important field. Describe who the agent is and how it should behave, in plain English: "You are Emma, a warm AI nurse assistant for City Clinic. Help patients book, reschedule, or cancel appointments. Always confirm the date and time before finishing."
- Welcome Message — the first thing the agent says when a call connects.
- Pick a Language and Connection Type (leave the defaults if unsure).
Click Save Changes when done.
7 · Providers — give it a voice, ears, and a brain
An agent needs three engines before it can talk. Set them on the Providers tab (or reuse saved keys — see below):
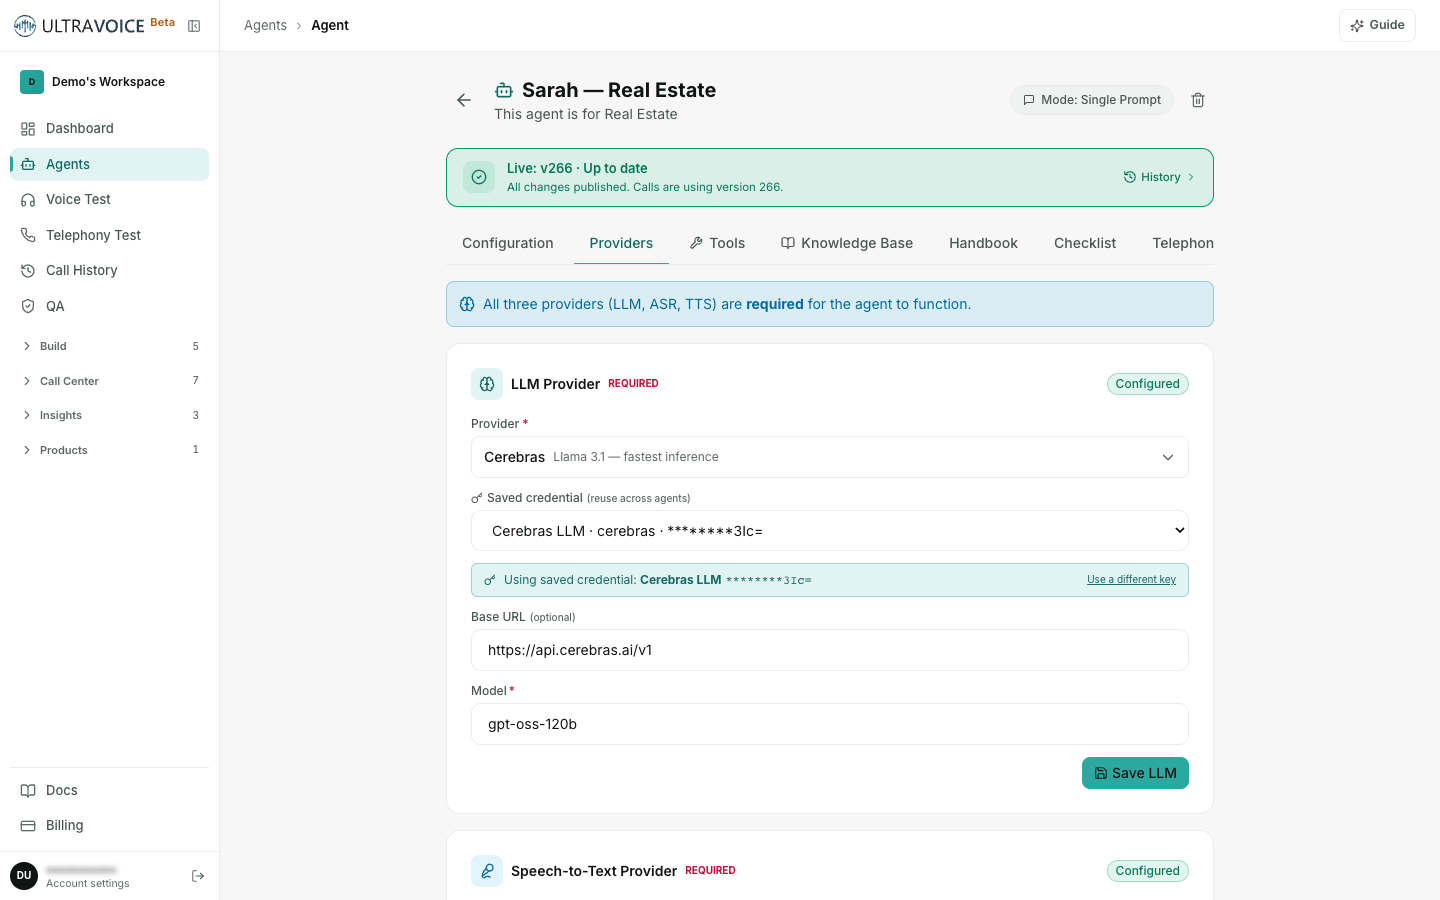
- Speech-to-Text (ASR) — how the agent hears the caller (e.g. Deepgram).
- LLM (the brain) — the model that decides what to say (e.g. OpenAI, Gemini, Anthropic).
- Text-to-Speech (TTS) — the voice the agent speaks with (e.g. ElevenLabs, Cartesia).
Save each with Save LLM, Save ASR, and Save TTS. You can also set an optional Analysis LLM used for post-call summaries and QA.
All three (LLM + STT + TTS) are required before an agent can take a live call. You bring your own provider keys — UltraVoice hosts no models.
Credentials — save keys once, reuse everywhere
Under Build → Credentials you'll find Provider Credentials. Save a key here once and reuse it across every agent — keys are encrypted at rest, scoped to your workspace, and never shown in full.
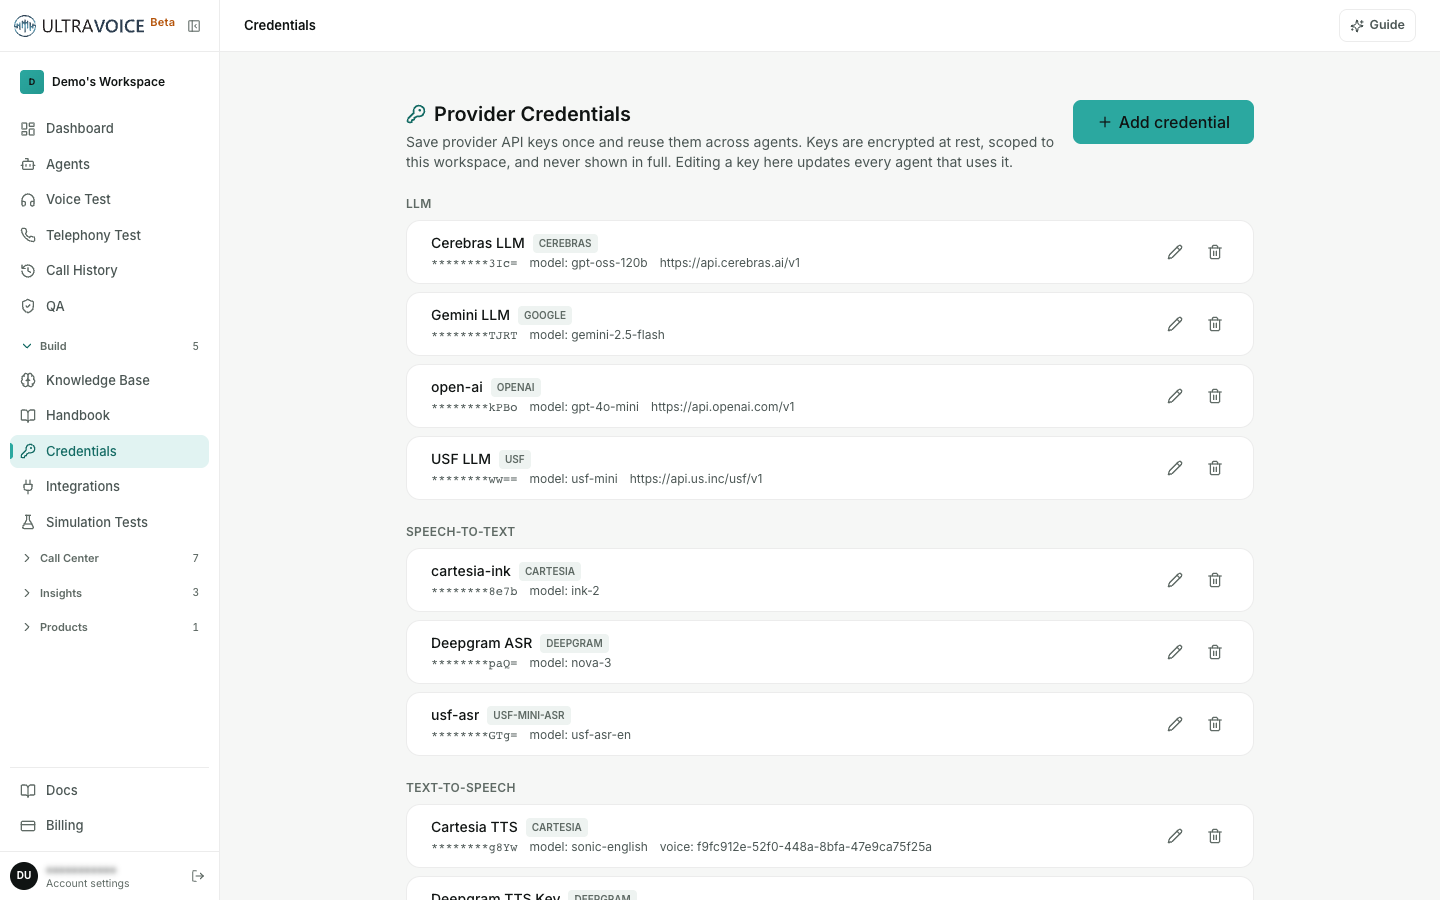
- Click Add credential.
- Choose the Type — LLM, Speech-to-Text, or Text-to-Speech.
- Pick the Provider, give it a Name, paste the API Key (plus optional Base URL, Model, or Voice ID).
- Save. The key is validated before it's stored.
8 · Publish — make your changes go live
Saving edits creates a draft. Calls keep using the last published version until you publish the new one. Use the version banner at the top of the editor:
- A brand-new agent shows Not published yet → click Publish v1.
- After edits, the banner shows a draft → click Publish v2 (v3, …) to push it live.
- When everything is published, the banner reads Live.
9 · Knowledge Base — give it the facts
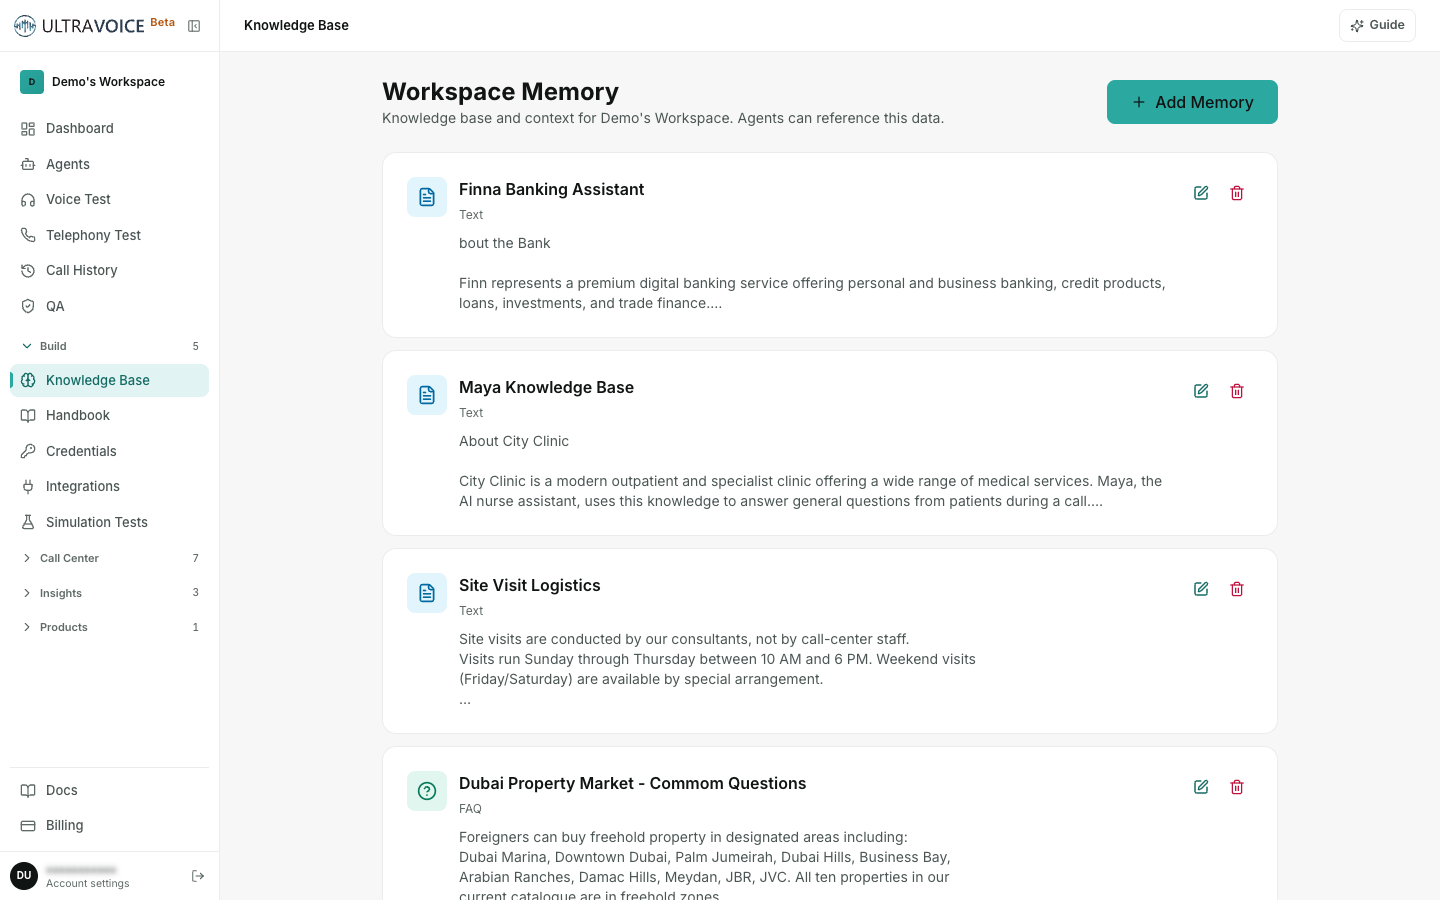
Feed your agent your own content — FAQs, price lists, policies — so it answers accurately instead of guessing. Manage knowledge globally under Build → Knowledge Base (Add Memory)…
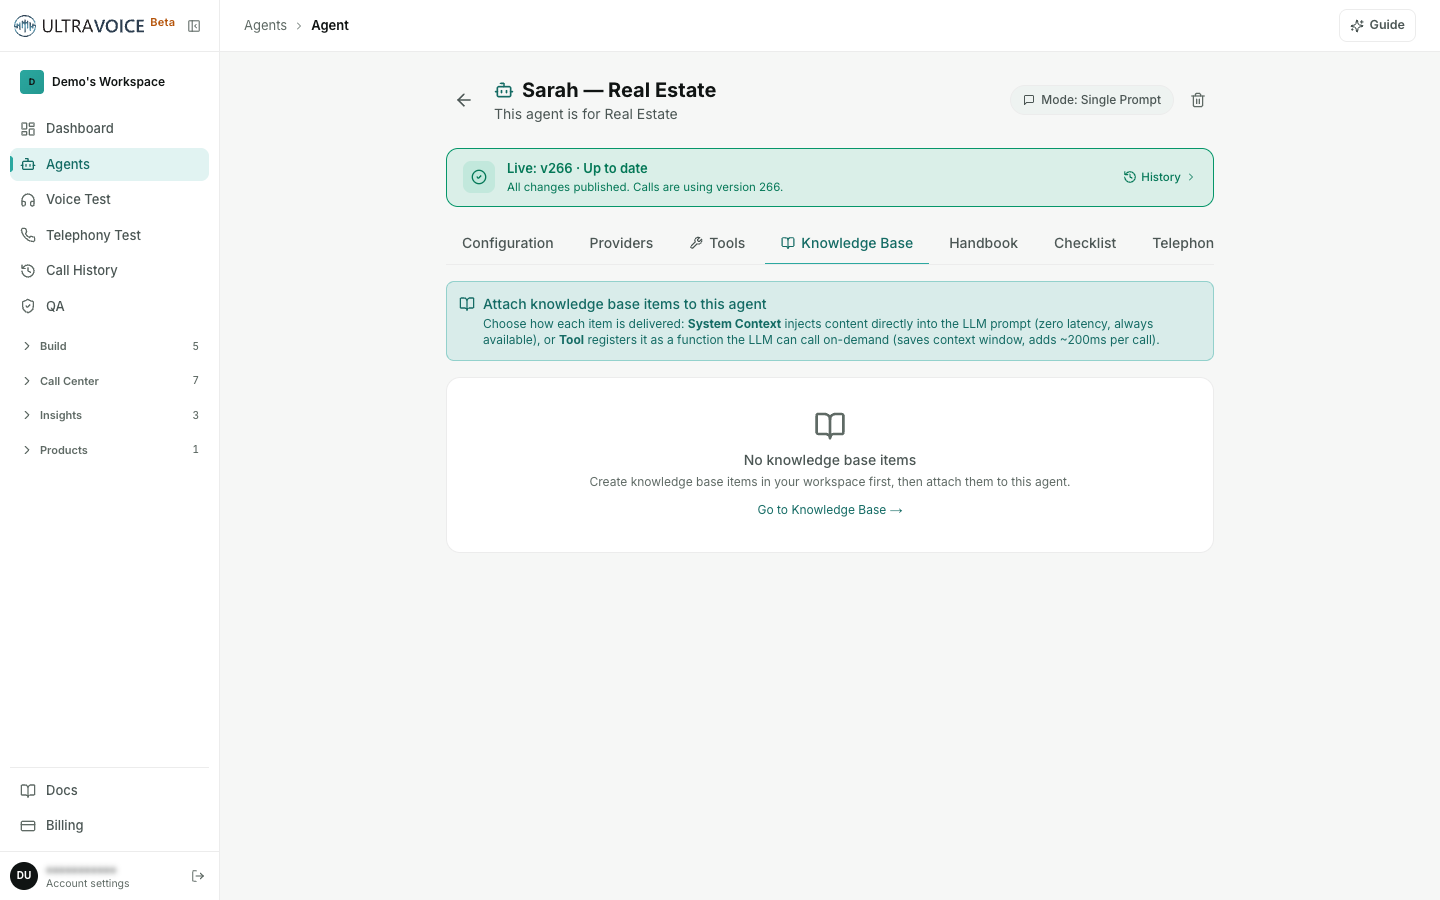
…then attach it to a specific agent from that agent's Knowledge Base tab.
Tip: Use the Knowledge Base for facts ("our hours are 9–5") and the system prompt / Handbook for behaviour ("always greet by name, never argue with a customer").
10 · Handbook — reusable prompt snippets
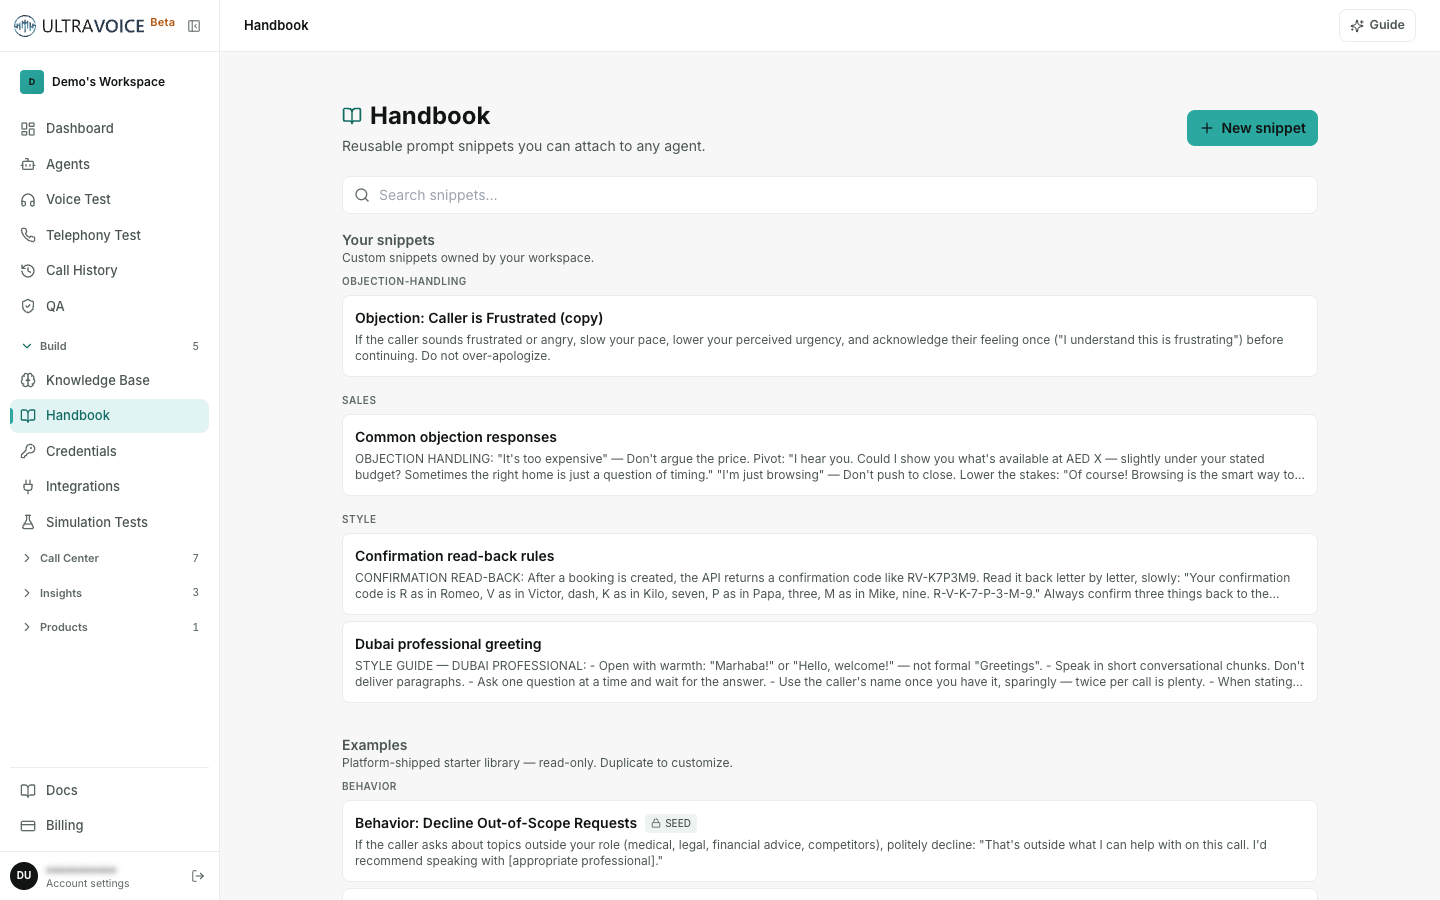
Under Build → Handbook you can write reusable prompt snippets and attach them to any agent — great for shared policies, tone, or disclaimers you want to keep consistent across a fleet of agents. Create one with New snippet, then attach it from an agent's Handbook tab.
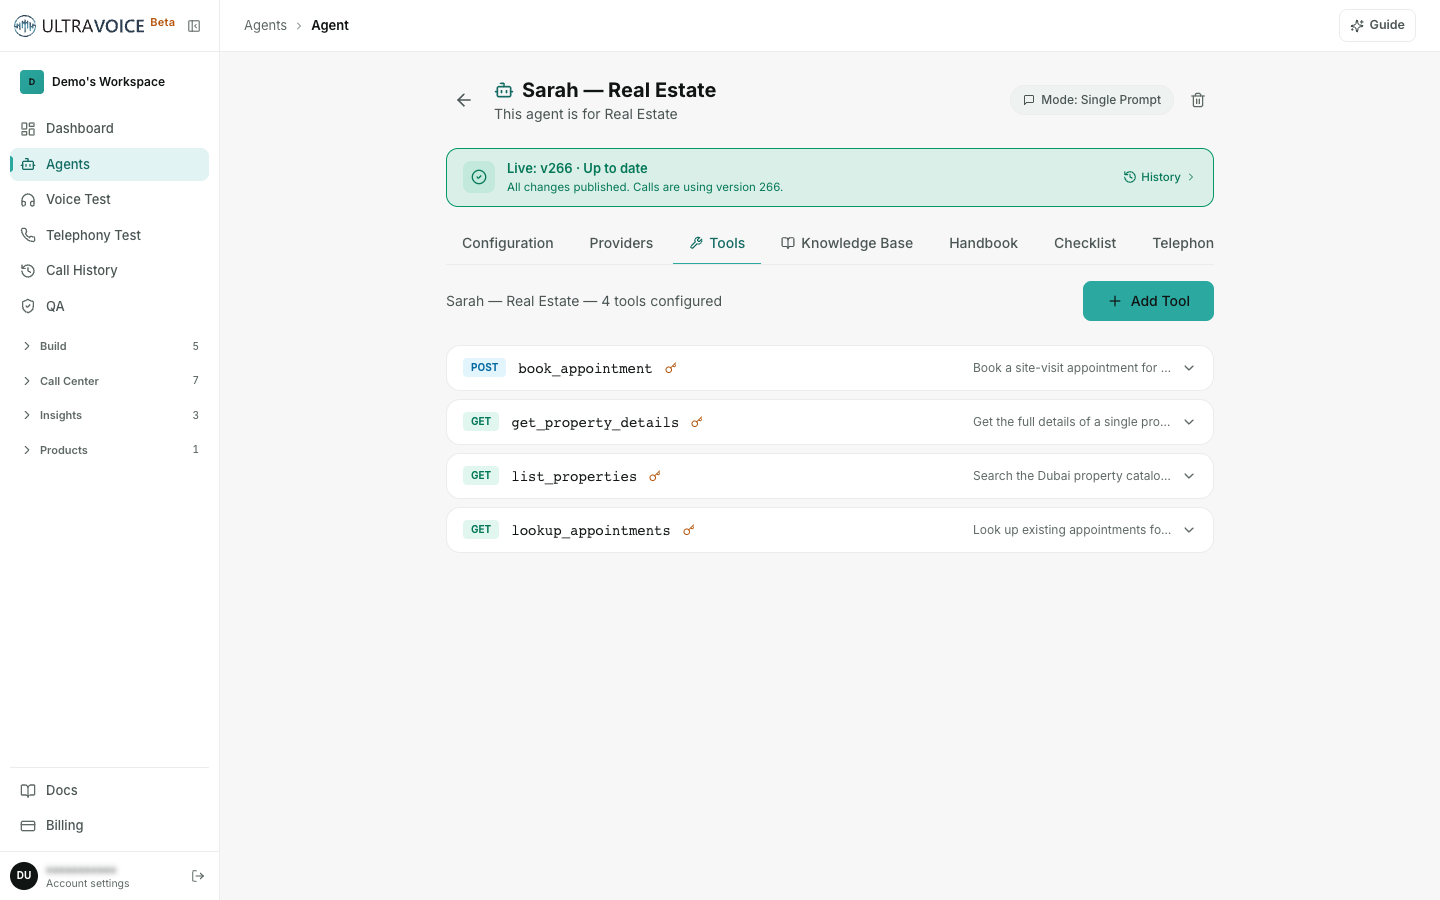
11 · Tools — let the agent do things
Tools let your agent take actions mid-call — look up an order, check a calendar, book a slot — instead of only talking. Add a tool on the Tools tab, give it a clear name and description, and (for tools that call your own API) an endpoint. The agent uses it when it makes sense.
Connectors: Under Build → Integrations you can connect third-party services (e.g. a calendar) once, then enable them per-agent in the Tools tab.
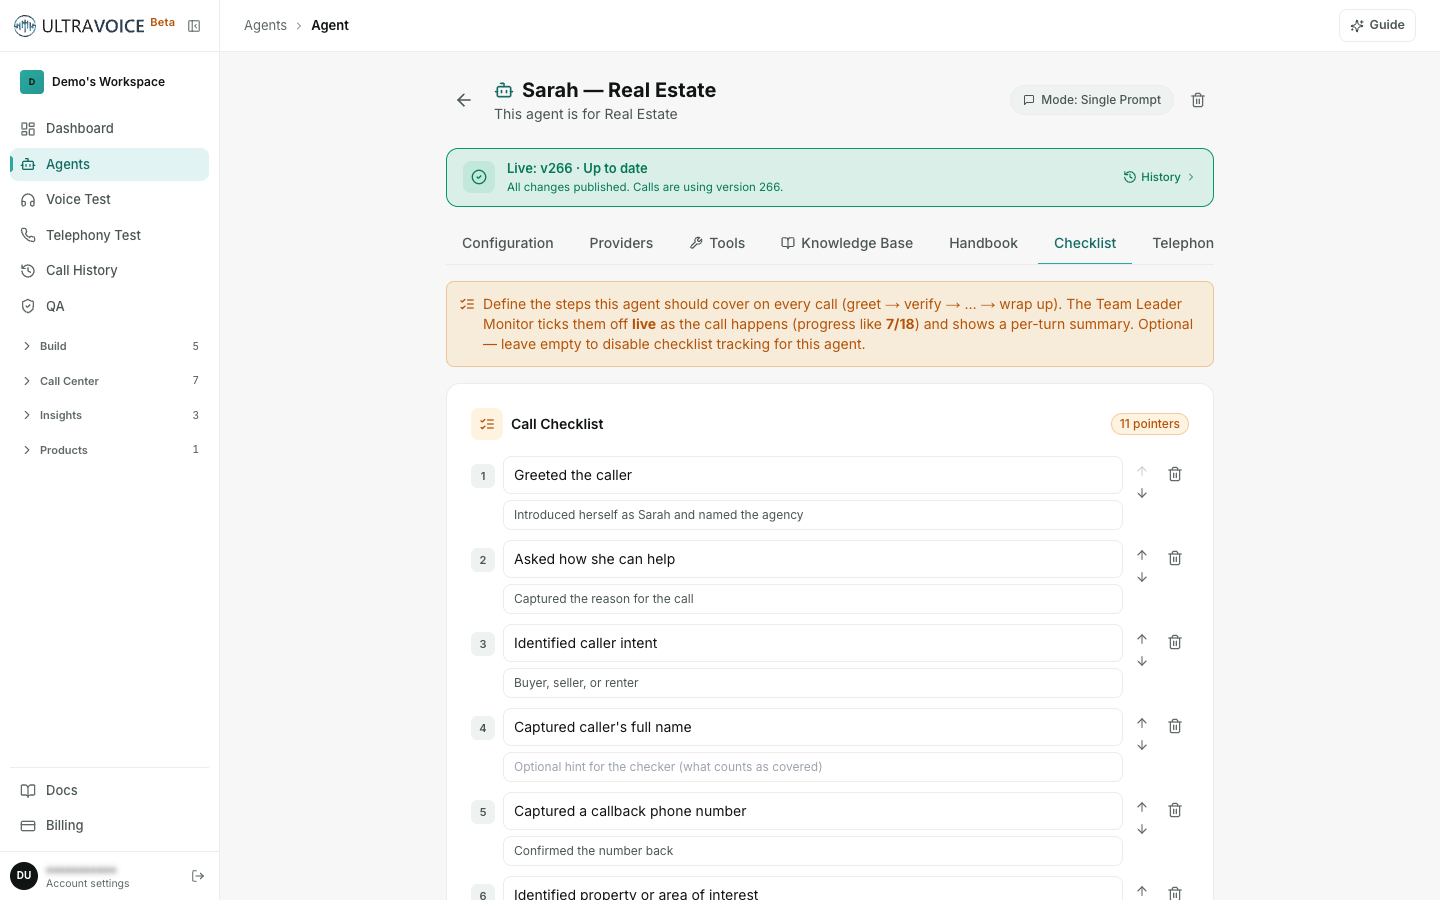
12 · Checklist (optional)
The Checklist tab lets you list the points an agent should cover on every call (e.g. "verify identity", "confirm the appointment time"). During live calls, a team leader's monitor ticks these off automatically as they're met — a great quality signal.
13 · Flow Builder — step-by-step conversations (optional)
Most agents work great with just a system prompt. But when a call must follow exact steps — collect specific information in order, branch on the answer, or call a tool at just the right moment — the Flow Builder lets you draw the conversation as a diagram. Open an agent and switch to the Flow Builder tab.
- Drag blocks from the left palette and connect them: Welcome · Conversation · Question / Decision (branch) · Tool Call / Variable · Transfer (hand to a human) · End.
- The graph saves automatically — but it only goes live when you click Activate Flow Mode. Building or saving never activates it on its own.
Important: The yellow banner "This flow is not active" means calls are still using the agent's single system prompt. Your flow takes over only after you activate Flow Mode — and you can switch back to Single-Prompt Mode any time.
The Flow Builder is best used on a desktop; on a small screen you'll see a read-only summary of the flow instead of the canvas.
Part 3 — Test your agent
14 · Voice Test — talk to it in your browser
The fastest way to hear your agent. Open Voice Test (the Voice Test Studio), pick an agent, and click Start Call — a real, live voice conversation right in your browser, no phone needed.
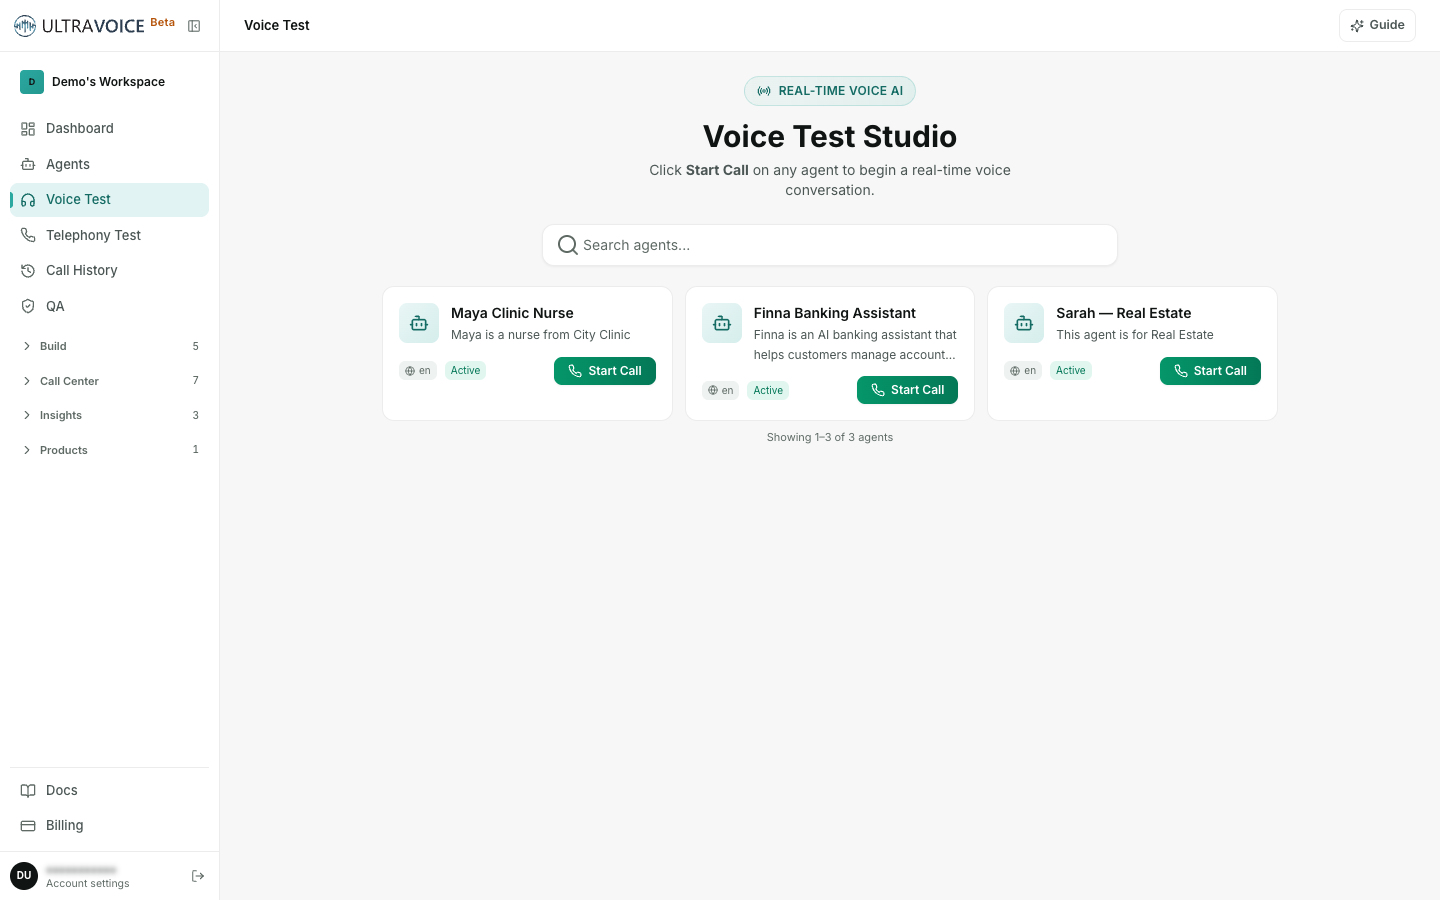
- Choose your agent and click Start Call.
- Allow microphone access when your browser asks.
- Speak naturally — the agent listens, thinks, and replies out loud. Watch the live transcript.
- Use Mute if needed, and End Call when you're done.
Note: Use a headset for the cleanest experience. Live voice/telephony calls draw a small amount of wallet credit (billed by the second); building and editing agents is free.
15 · Simulation Tests — automated test conversations
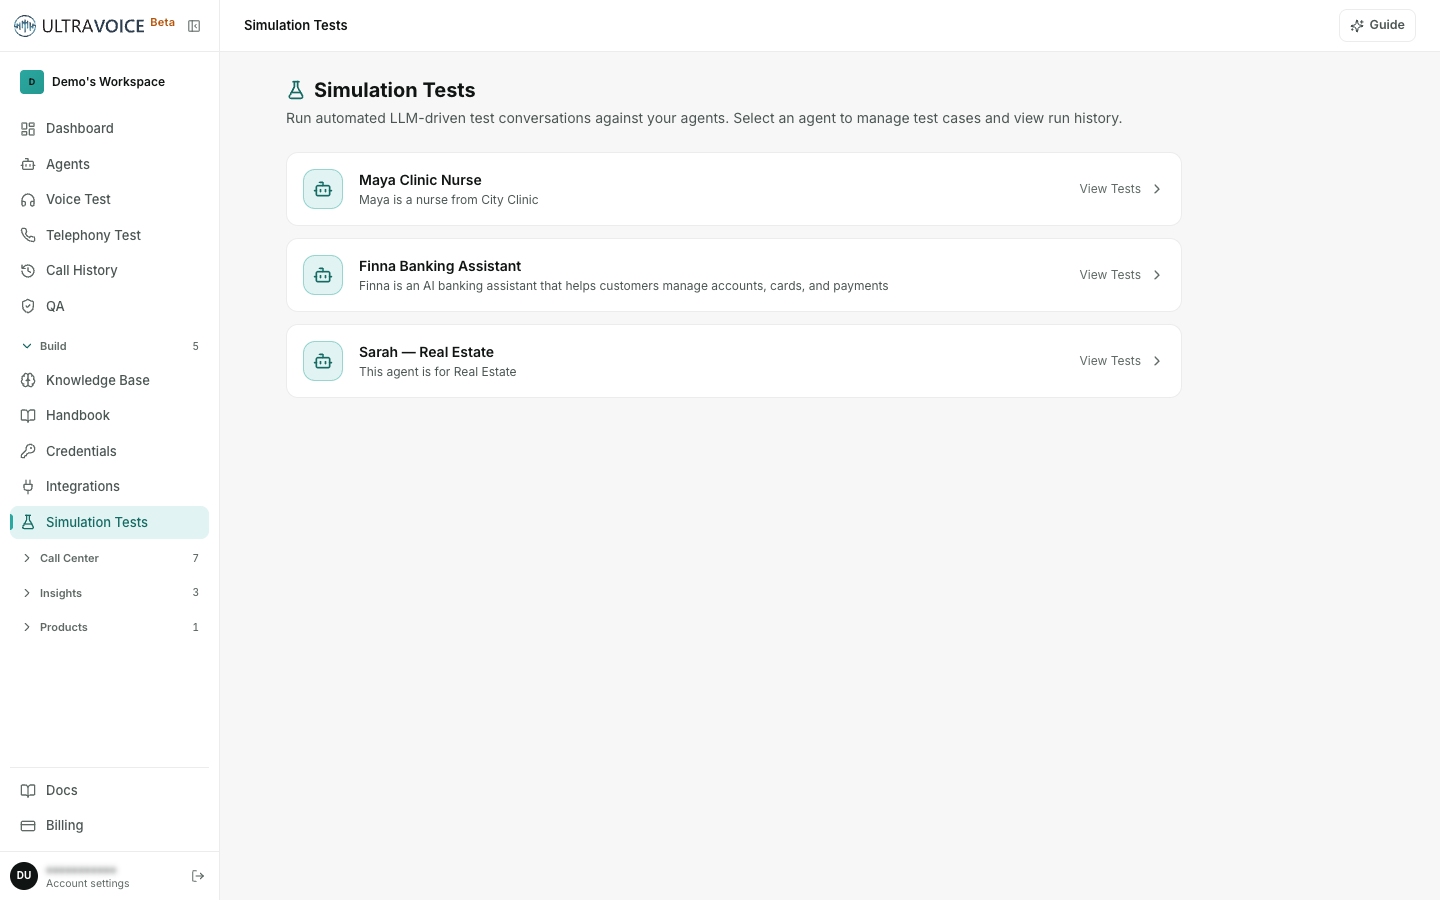
Under Build → Simulation Tests you can run LLM-driven test conversations against an agent — a fast way to check its behaviour after a prompt change without dialling in yourself. Pick an agent, run the suite, and review each simulated conversation and its result.
Part 4 — Put it on the phone (Twilio setup)
This is where your agent starts taking real phone calls. UltraVoice uses Twilio for telephony. You'll need a Twilio account with a Voice-capable phone number.
16 · Connect a Twilio number so your agent takes calls
Do this in order:
-
In Twilio — buy (or pick) a Voice phone number, and copy your Account SID and Auth Token from the Twilio Console dashboard.
-
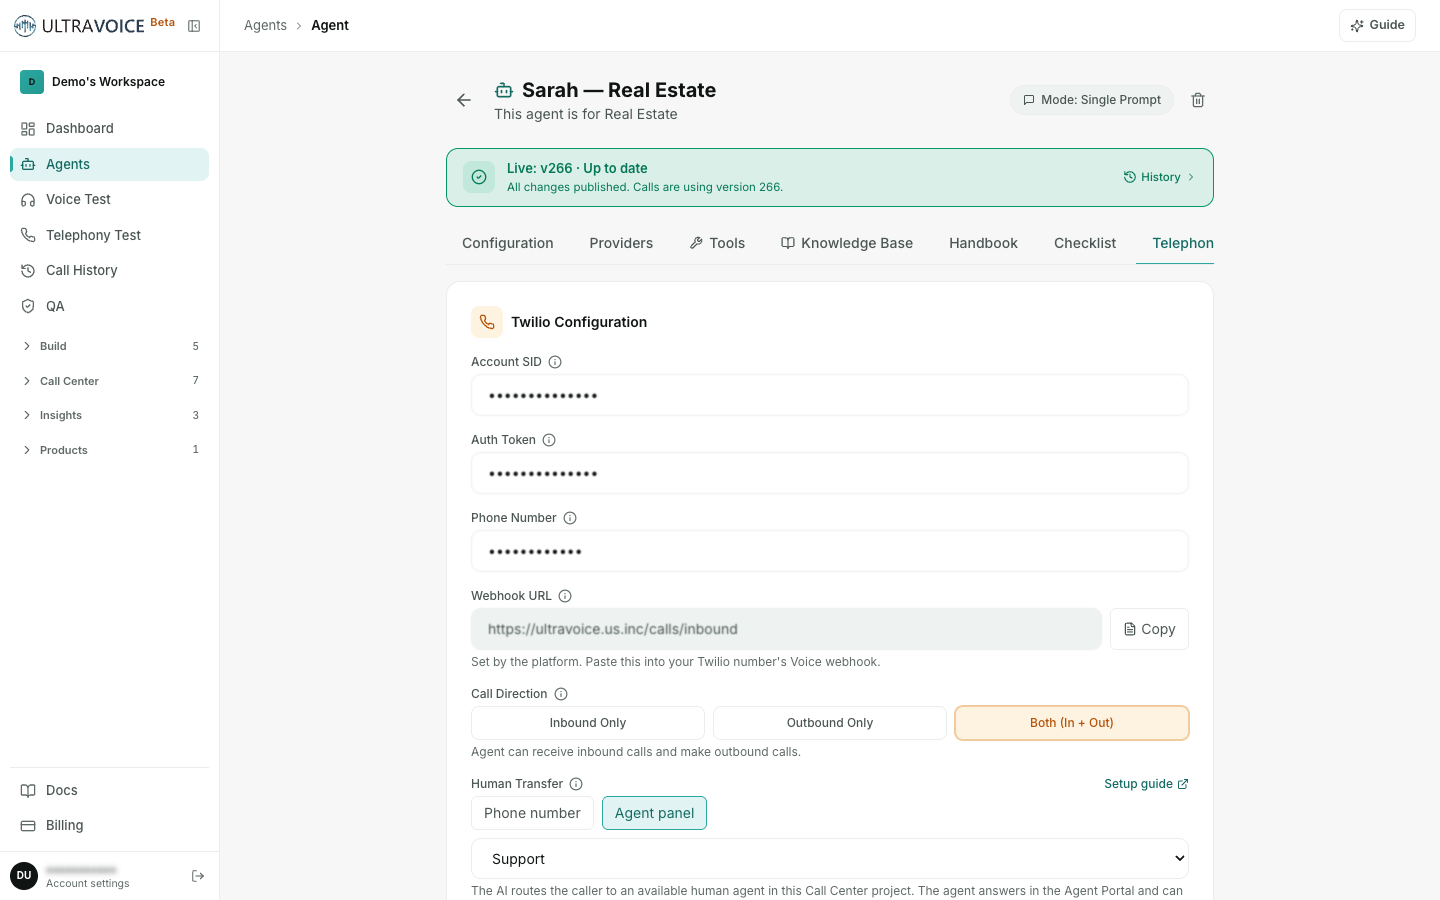
In UltraVoice — open your agent → Telephony tab, and fill in:
- Account SID (
AC…) - Auth Token
- Phone Number — your Twilio number in E.164 format (e.g.
+14155551234). - Call Direction — Inbound Only, Outbound Only, or Both (In + Out). Then click Save Telephony.
- Account SID (
-
Copy the Webhook URL. The Telephony tab shows a read-only Webhook URL with a Copy button. This is generated by the platform — you don't type it.
-
Paste it into Twilio. In the Twilio Console, open your phone number → the Voice section → "A call comes in", set it to Webhook, paste the copied URL, method POST, and save.
This step is manual — UltraVoice does not change your Twilio number's settings for you. Always paste the exact URL shown in the Telephony tab.
(This step happens in your Twilio Console, not in UltraVoice — set the "A call comes in" field to Webhook, paste the URL from the Telephony tab, and choose HTTP POST.)
-
Verify — dial your Twilio number from any phone. Your agent should answer with its welcome message. (Inbound-only or Both must be selected for the number to answer.)
17 · Telephony Test
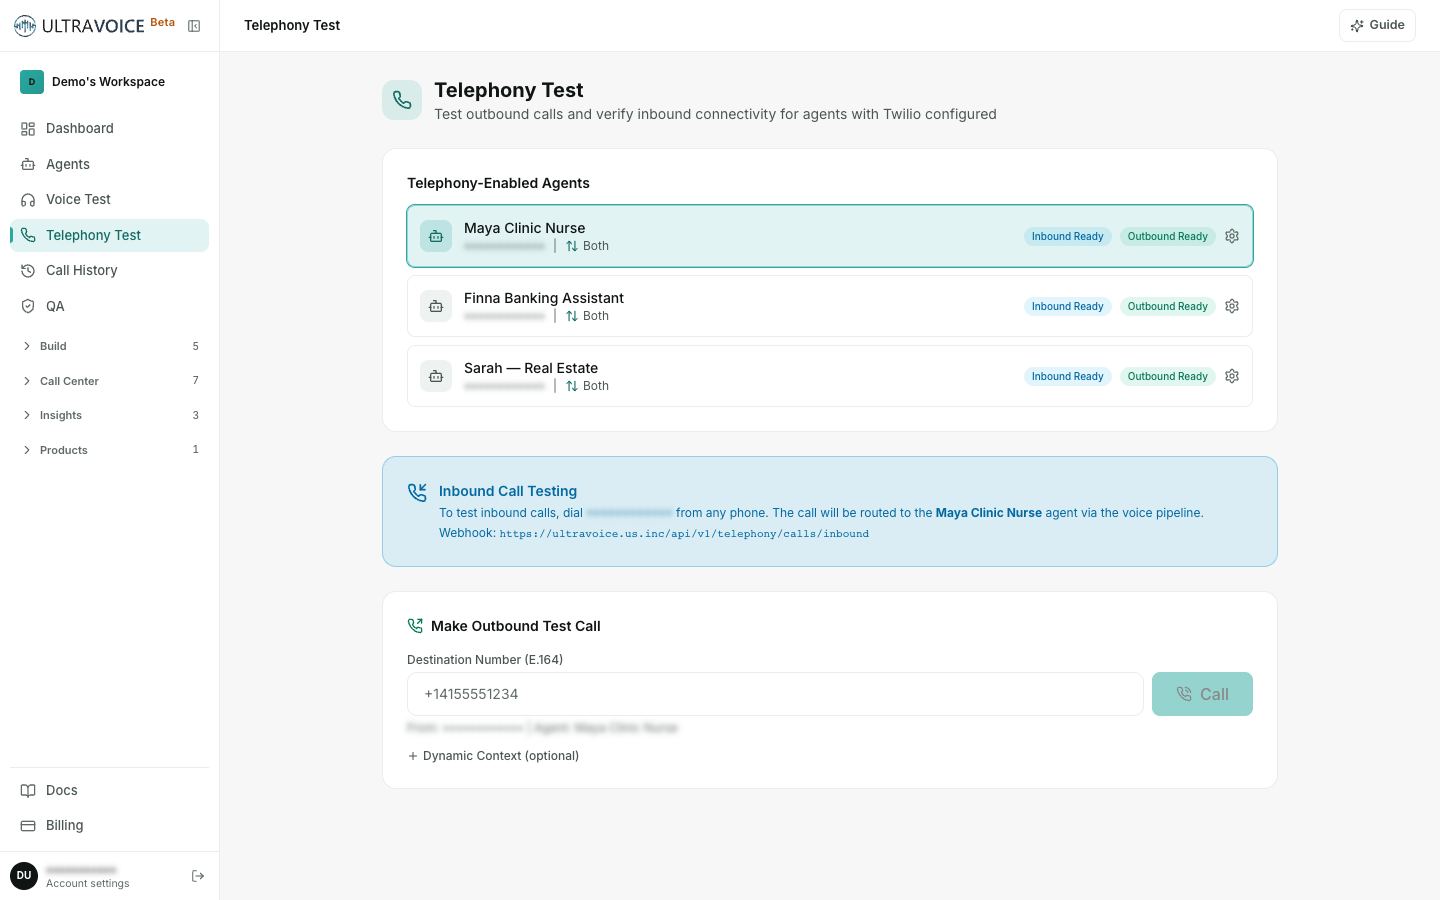
Telephony Test (top of the sidebar) lists every agent that has Twilio configured. Use it to:
- Place an outbound test call to any number (Test Call), and
- See the inbound instructions — which number to dial to reach the agent.
18 · Hand a call to a human (AI → human transfer)
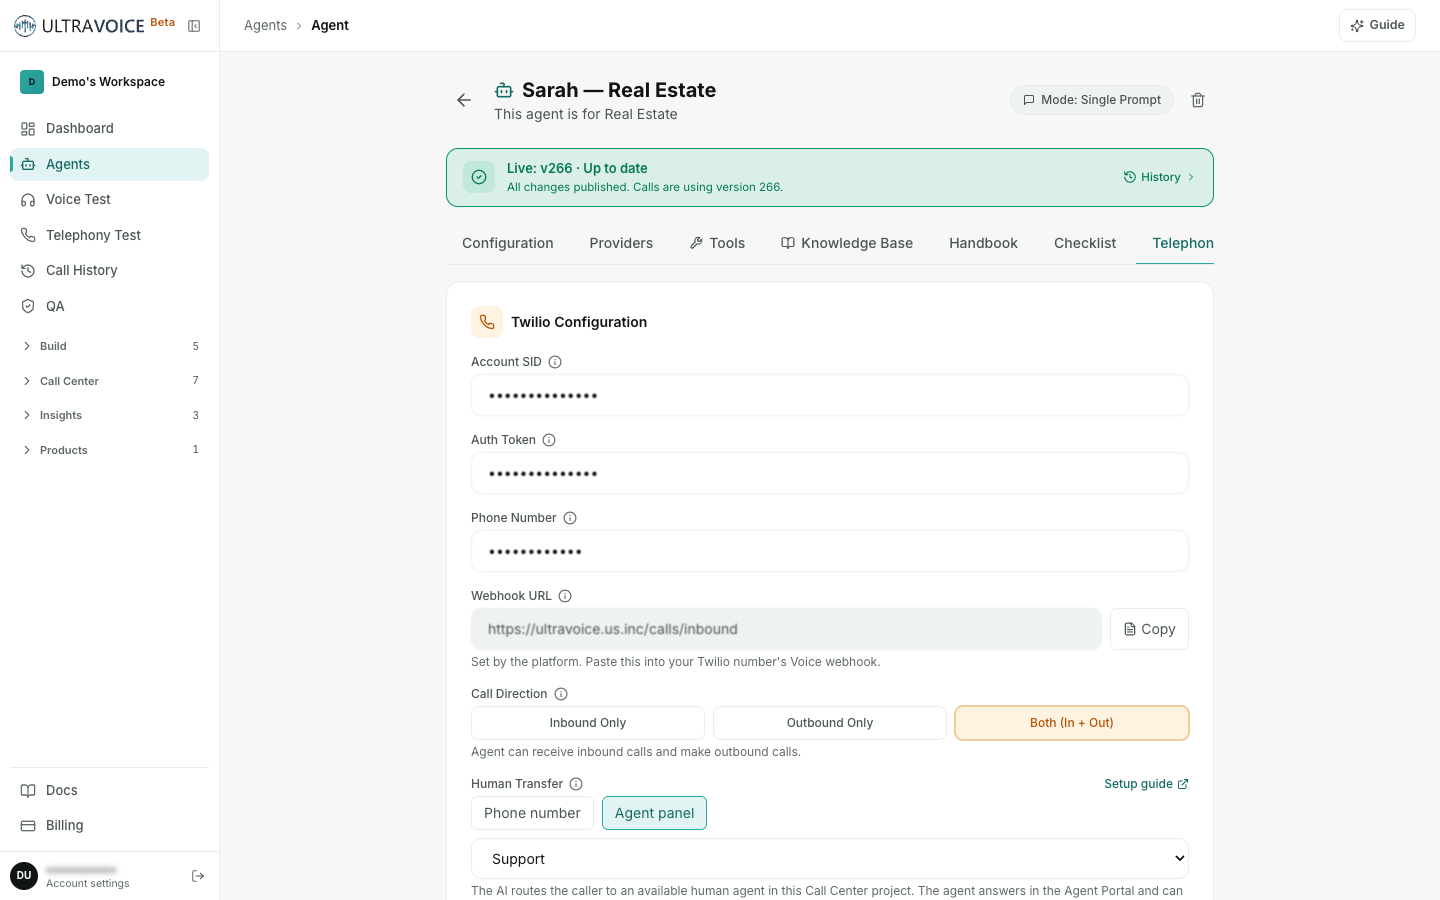
Your AI can transfer a live caller to a human agent. Two modes are available, set on the Telephony tab under Human Transfer. First, on the Configuration tab, turn on Allow Transfer to Human Agent (this becomes available once Twilio is saved).
Option A — Phone mode (dial a real number)
The simplest option: the AI dials a real phone number and drops off.
- Telephony tab → Human Transfer = Phone number.
- Enter the destination number in E.164 (e.g.
+14155559876). - Save. At runtime, the AI calls that number from your agent's Twilio number and hands the caller over.
Nothing else is needed — no Call Center, no portal. (The agent's Twilio number is used as the caller ID, so keep it saved.)
Option B — Agent panel mode (browser human agents)
Rings your human agents in their browser via the Agent Portal, and the AI can be handed back in. This needs a little more Twilio wiring (see the Call Center section for the people side):
-
Call Center → Settings → Twilio Configuration — fill in your Account SID, Auth Token, API Key (
SK…), API Secret, TwiML App SID (AP…), and Default Caller ID, then Save. (The API Key/Secret and TwiML App power the in-browser softphone.)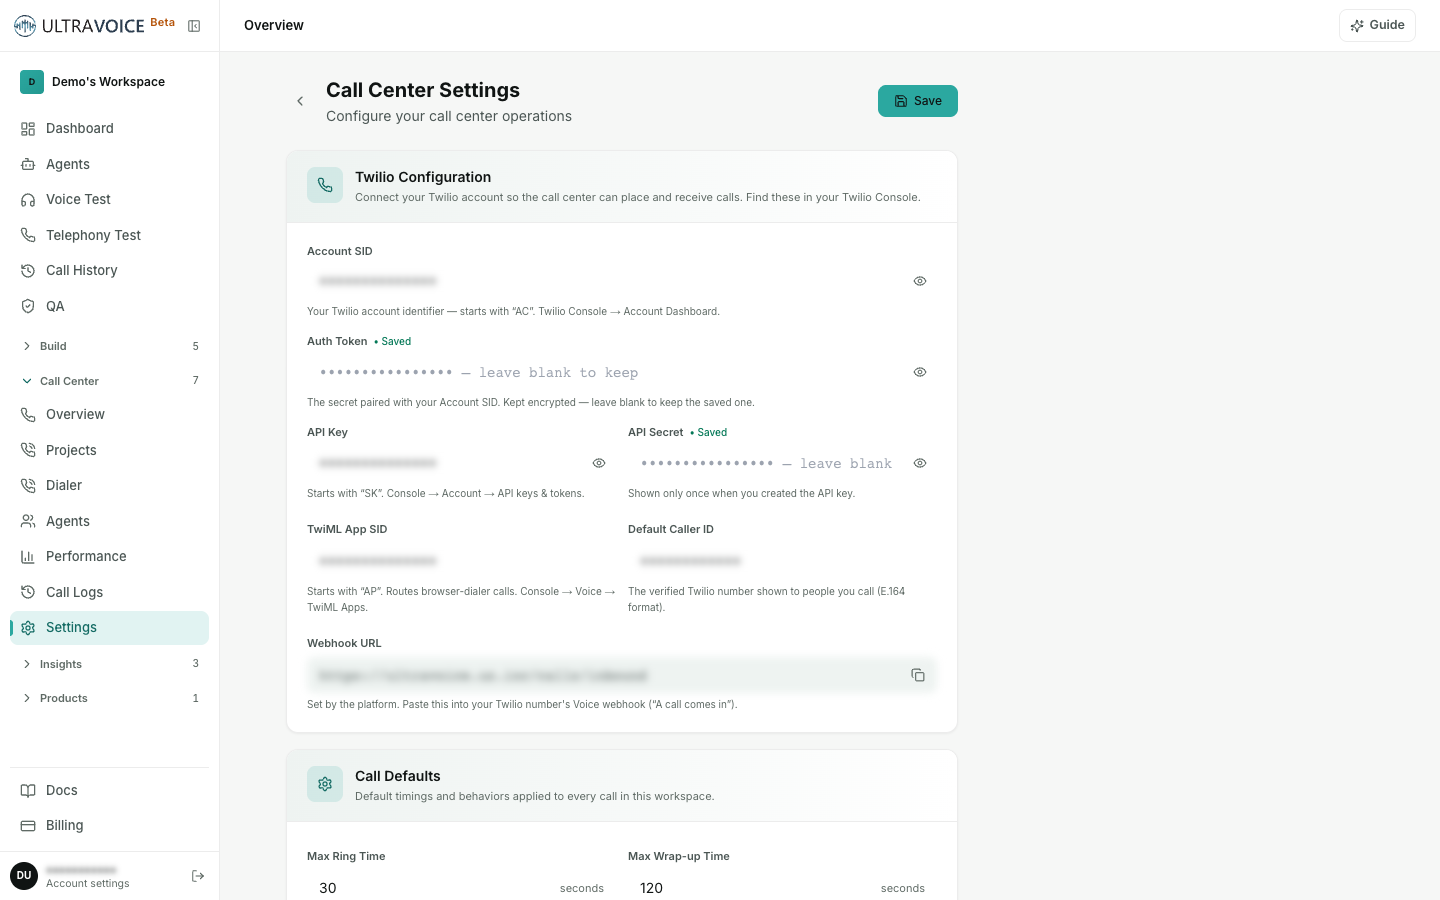
-
Create a Call Center project and add human agents to it (next section).
-
Agent → Telephony tab → Human Transfer = Agent panel, and select your project. Save.
TwiML App Voice URL: panel mode uses a Twilio TwiML App for the in-browser softphone. In the Twilio Console, set the TwiML App's Voice → Request URL to
https://ultravoice.us.inc/api/v1/call-bridge/twiml/voicewith method HTTP POST. This routes browser-dialer calls through UltraVoice's call-bridge.
19 · Campaigns — outbound calling at scale
Need to call a whole list? Insights → Campaigns dials a list of numbers with your chosen agent, paced automatically, and tracks each call's outcome.
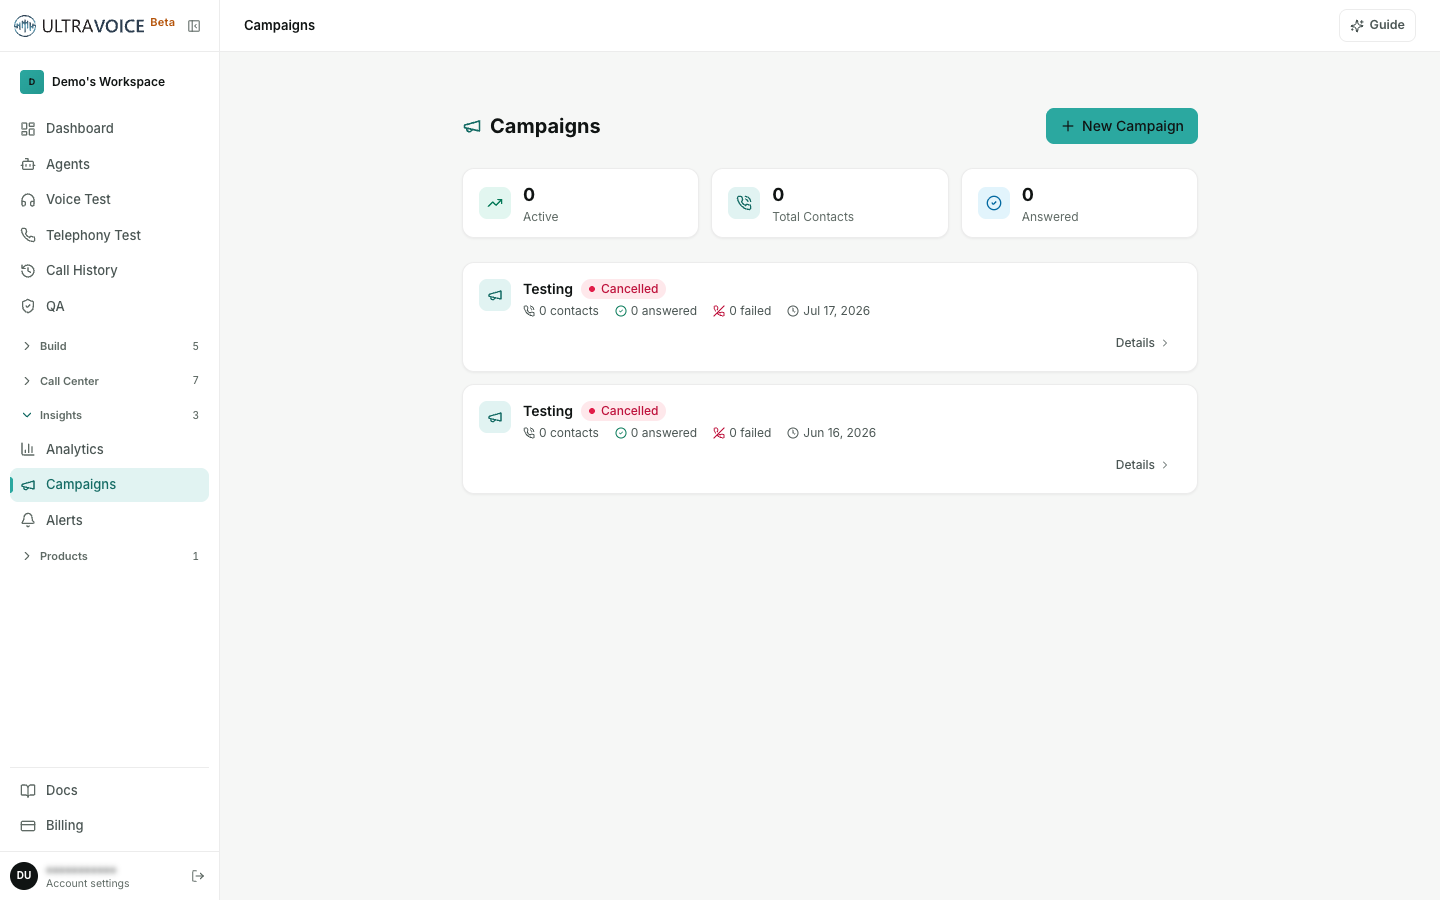
- New Campaign — pick the agent and set the from-number, pacing, and max concurrency.
- Upload your contact list (CSV of E.164 numbers).
- Start the campaign and watch calls dial, connect, and complete in real time.
Part 5 — Call Center (AI + humans together)
The Call Center lets your AI agents hand live calls to human agents, and gives team leaders a live view of everything. It's built around projects (a team + its phone queue), human agents, and a separate Agent Portal the humans log into.
20 · Overview
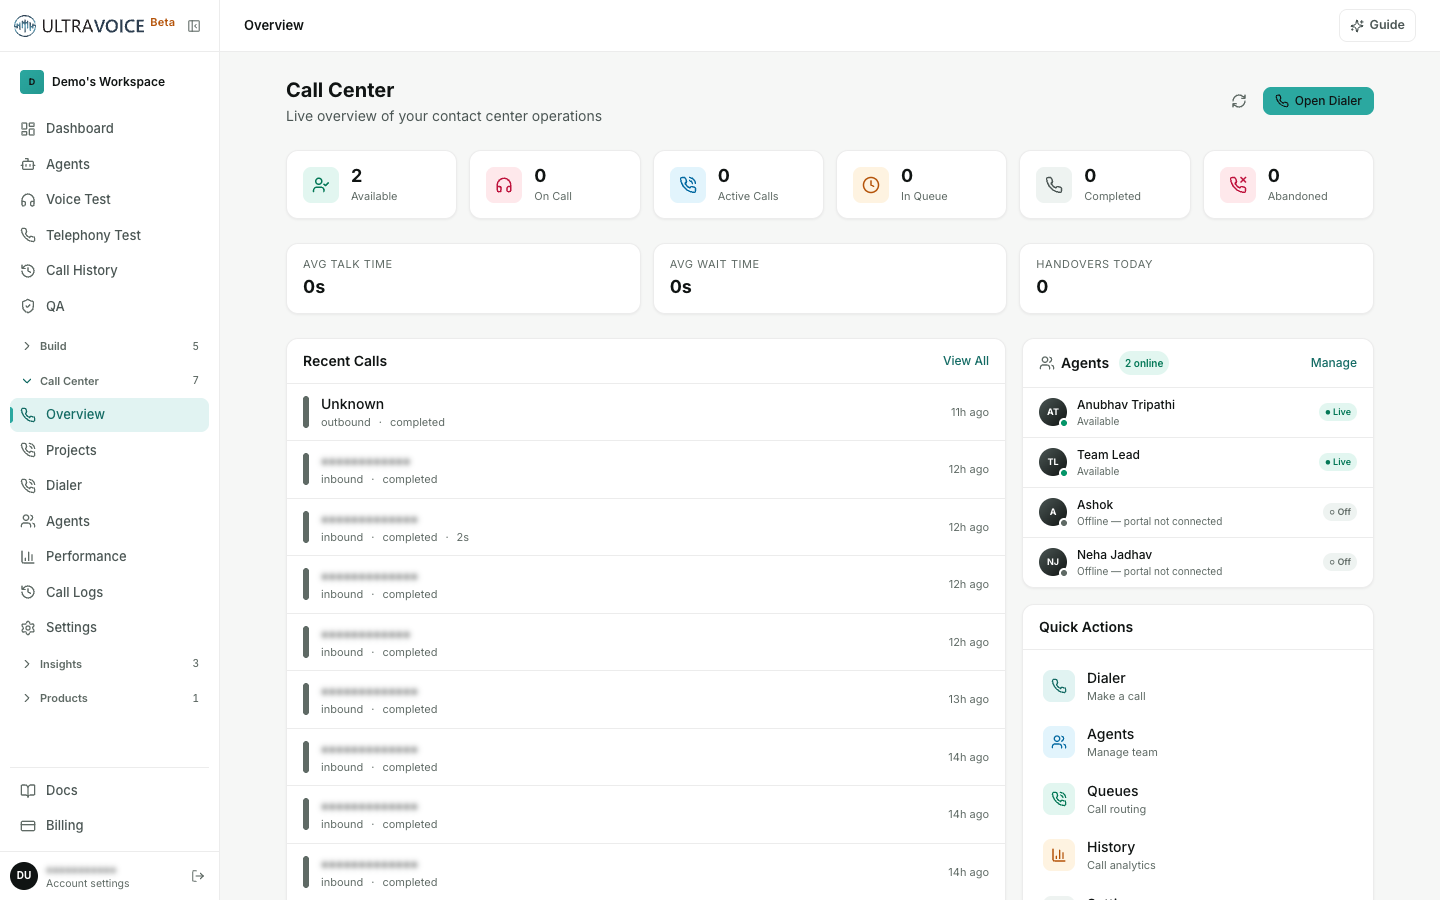
The Call Center → Overview is your control room: available agents, on-call and active calls, queue size, completed and abandoned counts, plus average talk/wait times and live/recent calls.
21 · Projects
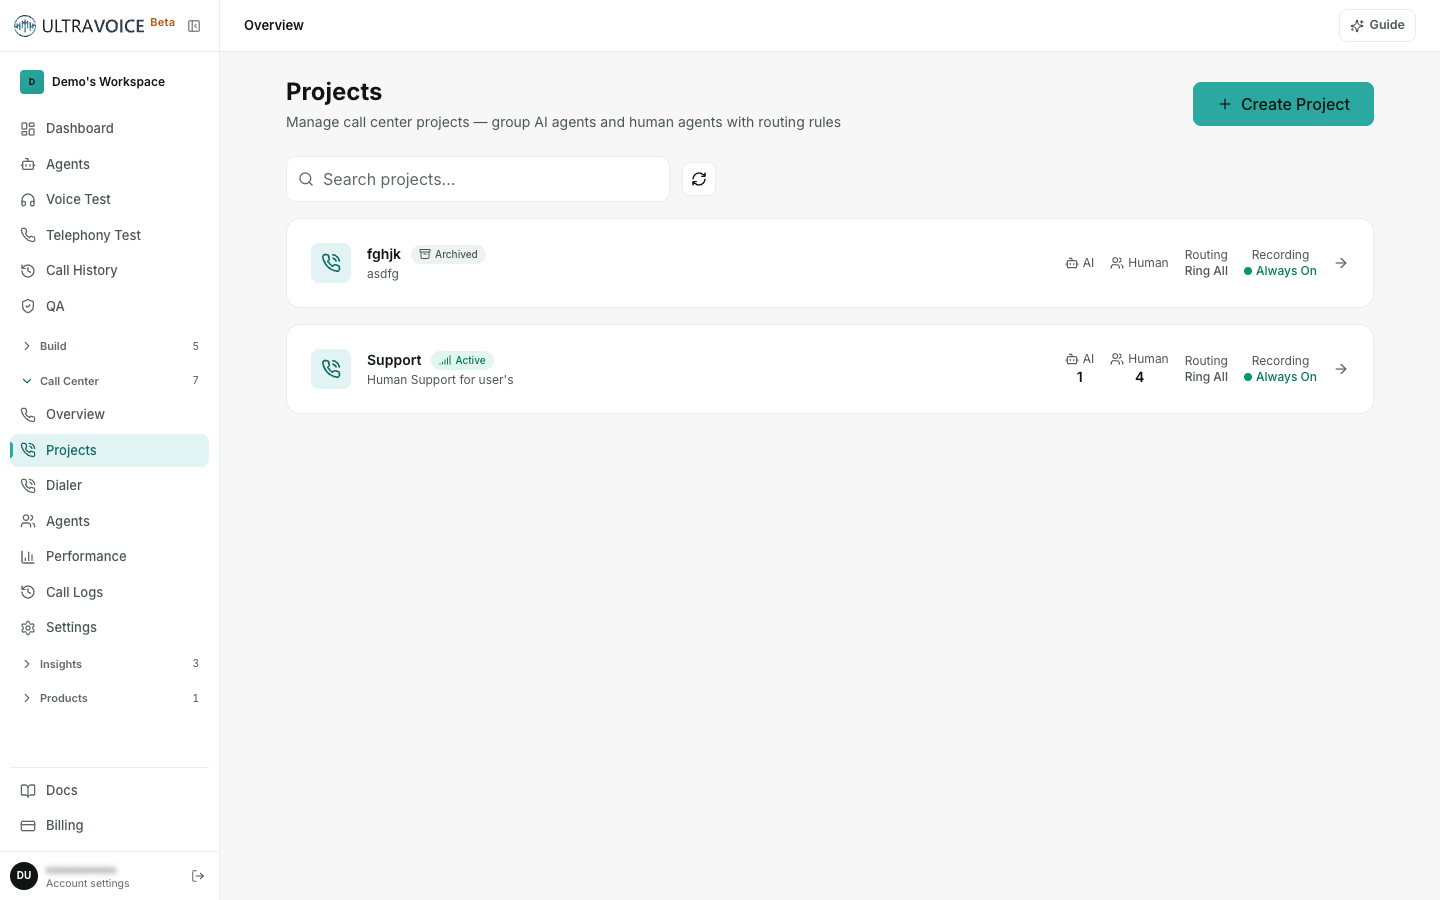
A project groups human agents behind a shared queue and routing rule. Calls transferred by the AI (panel mode) ring the project's available agents. Create one with Create Project.
22 · Human agents
Under Call Center → Agents ("Human Agents"), click Add Agent to add the people who take handed-off calls. Choose a Role:
- Agent — takes calls.
- Team Leader — takes calls and gets the Live Monitor in the Agent Portal.
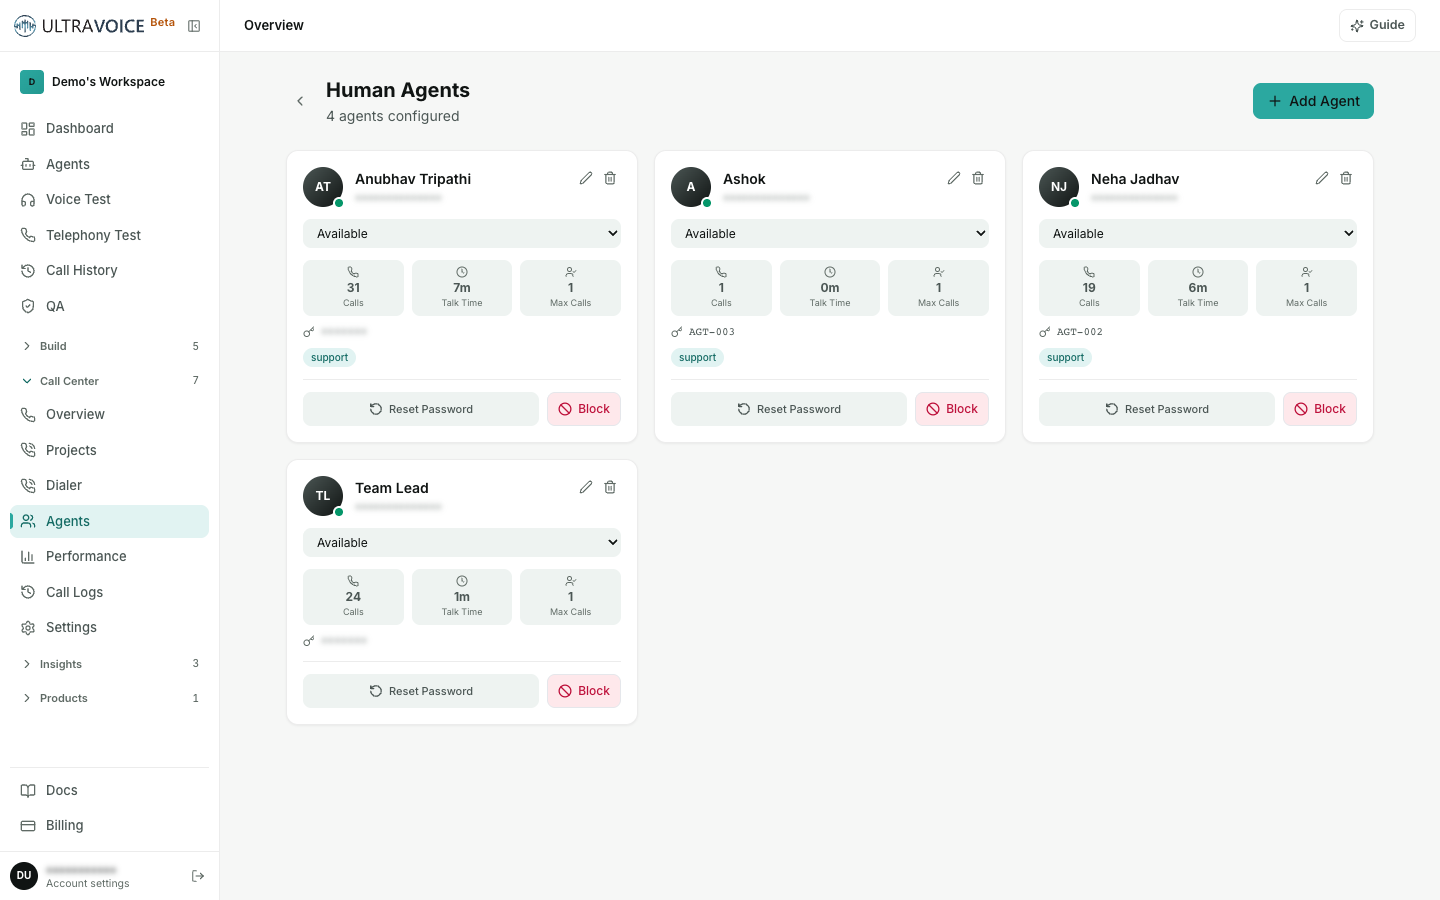
Each human agent gets their own login (workspace + agent code + password) for the Agent Portal — credentials are emailed automatically when you create them, and they set their own password on first sign-in.
23 · Dialer & queues
-
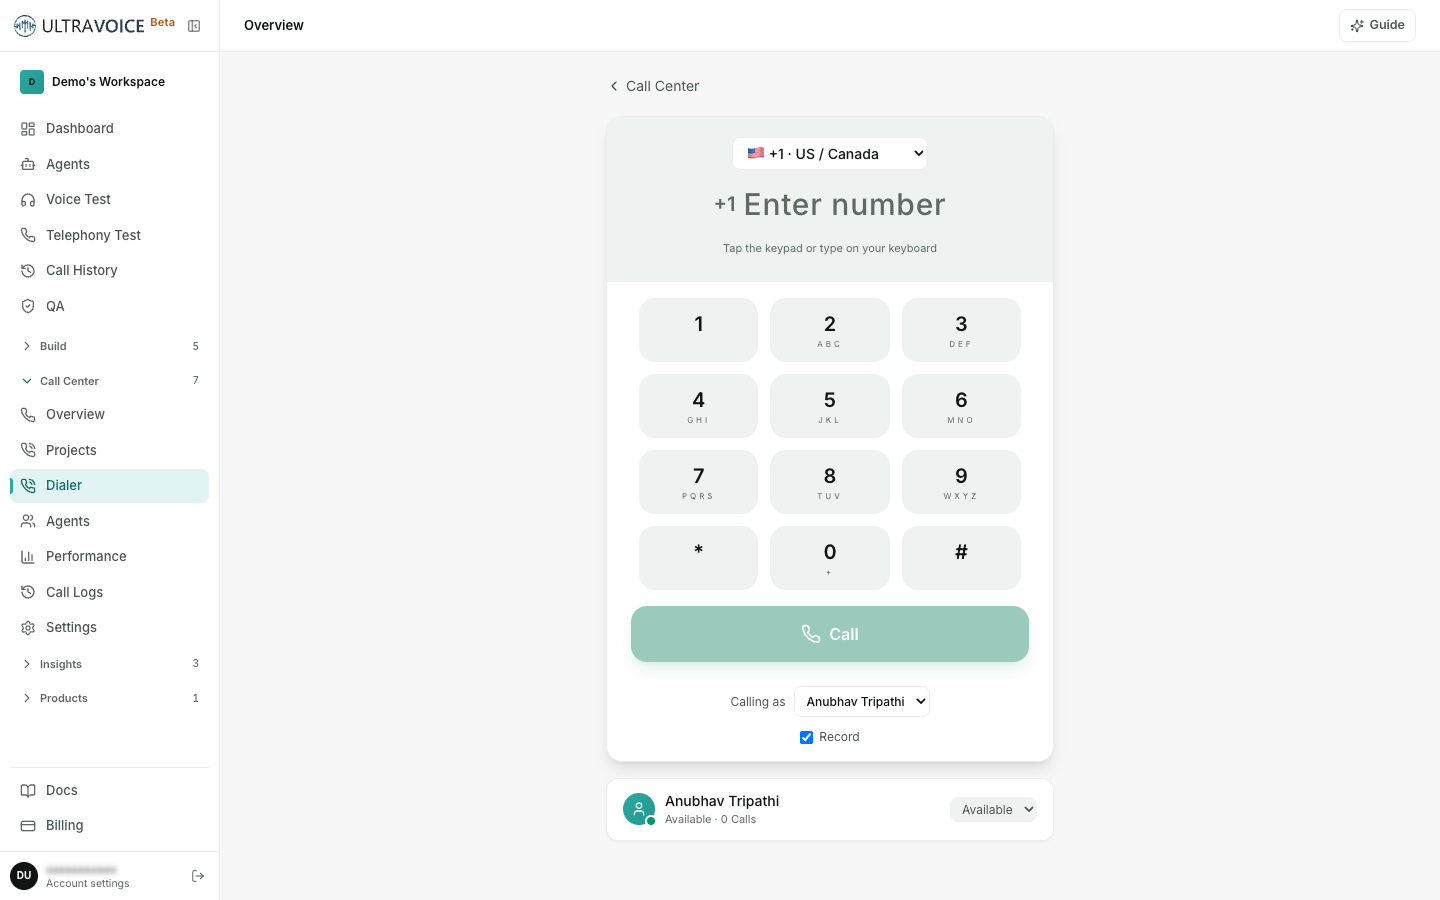
Dialer — a built-in browser softphone: a human agent can place outbound calls directly, put a caller on hold, or Transfer a live caller (including to an AI agent).
-
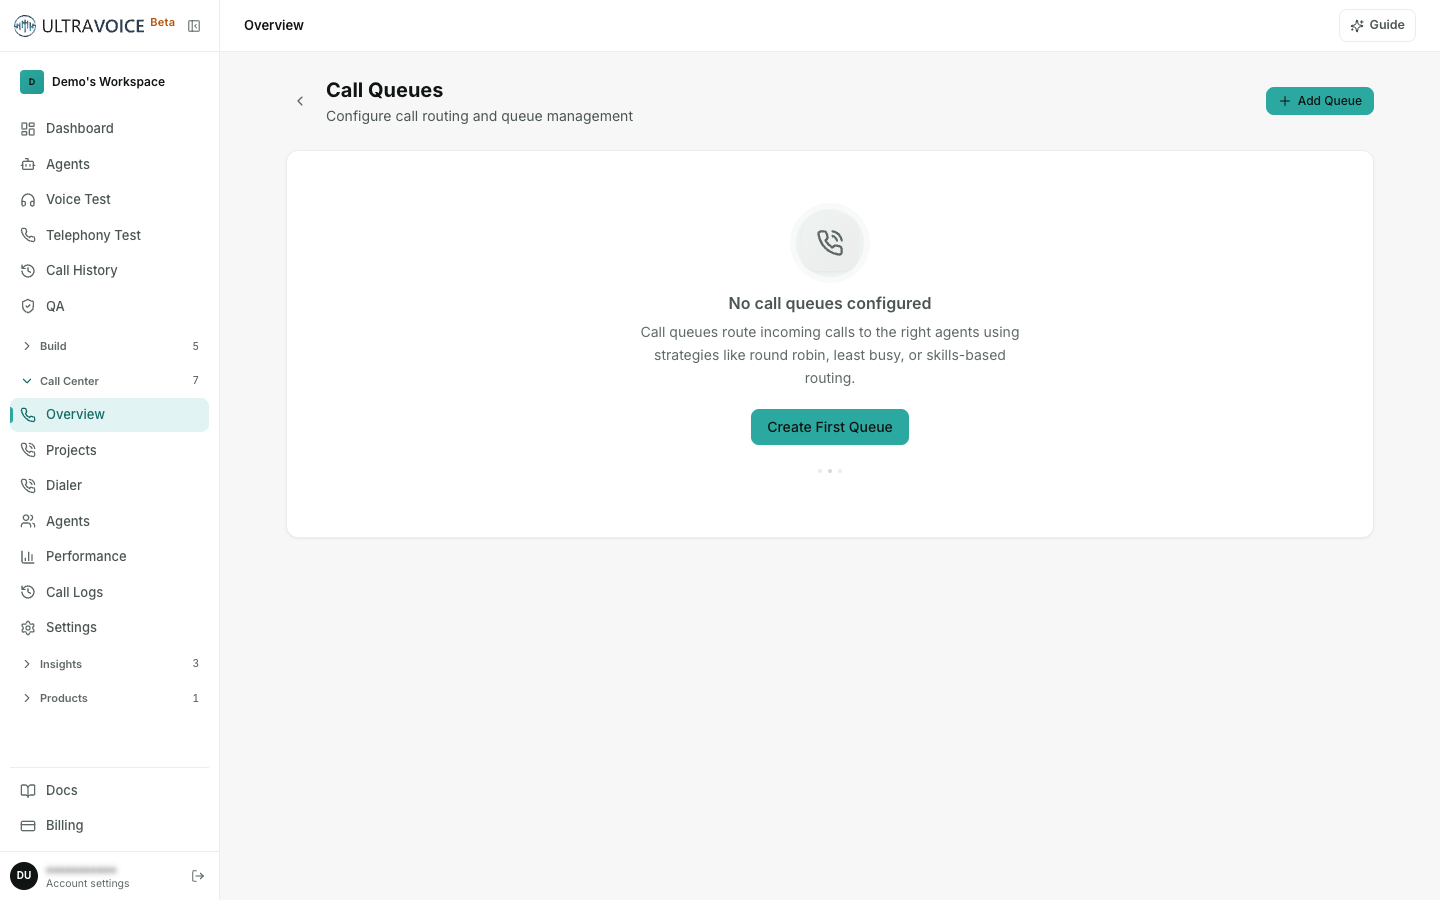
Queues — when every agent is busy, callers wait in a queue (staying with the AI) until someone frees up.
24 · Call Logs, Performance & Settings
-
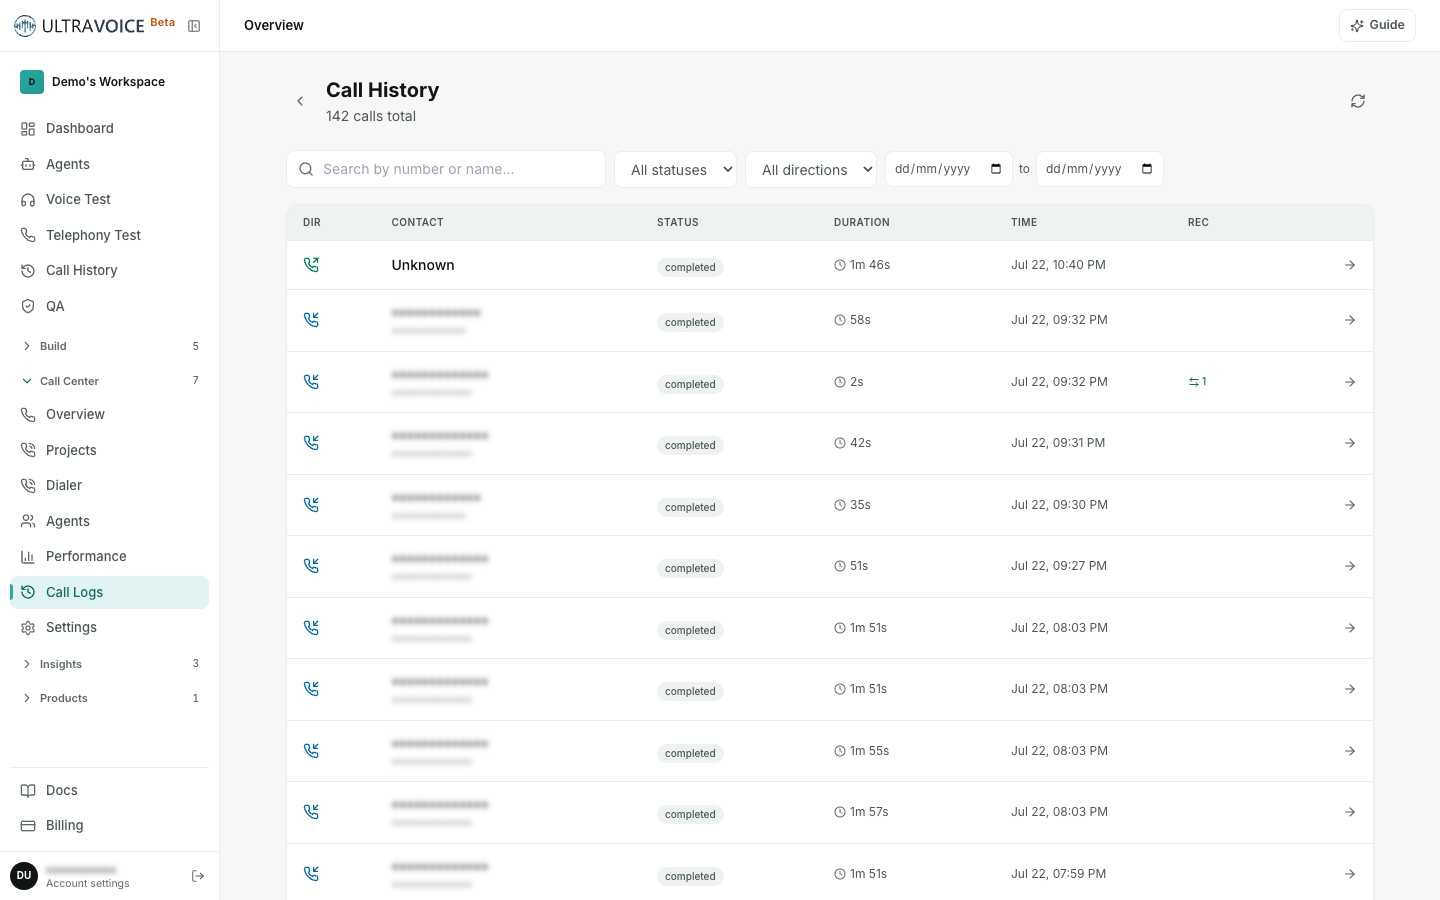
Call Logs — every call, folded into one row even when it moved AI → Human → AI, with full per-segment transcripts.
-
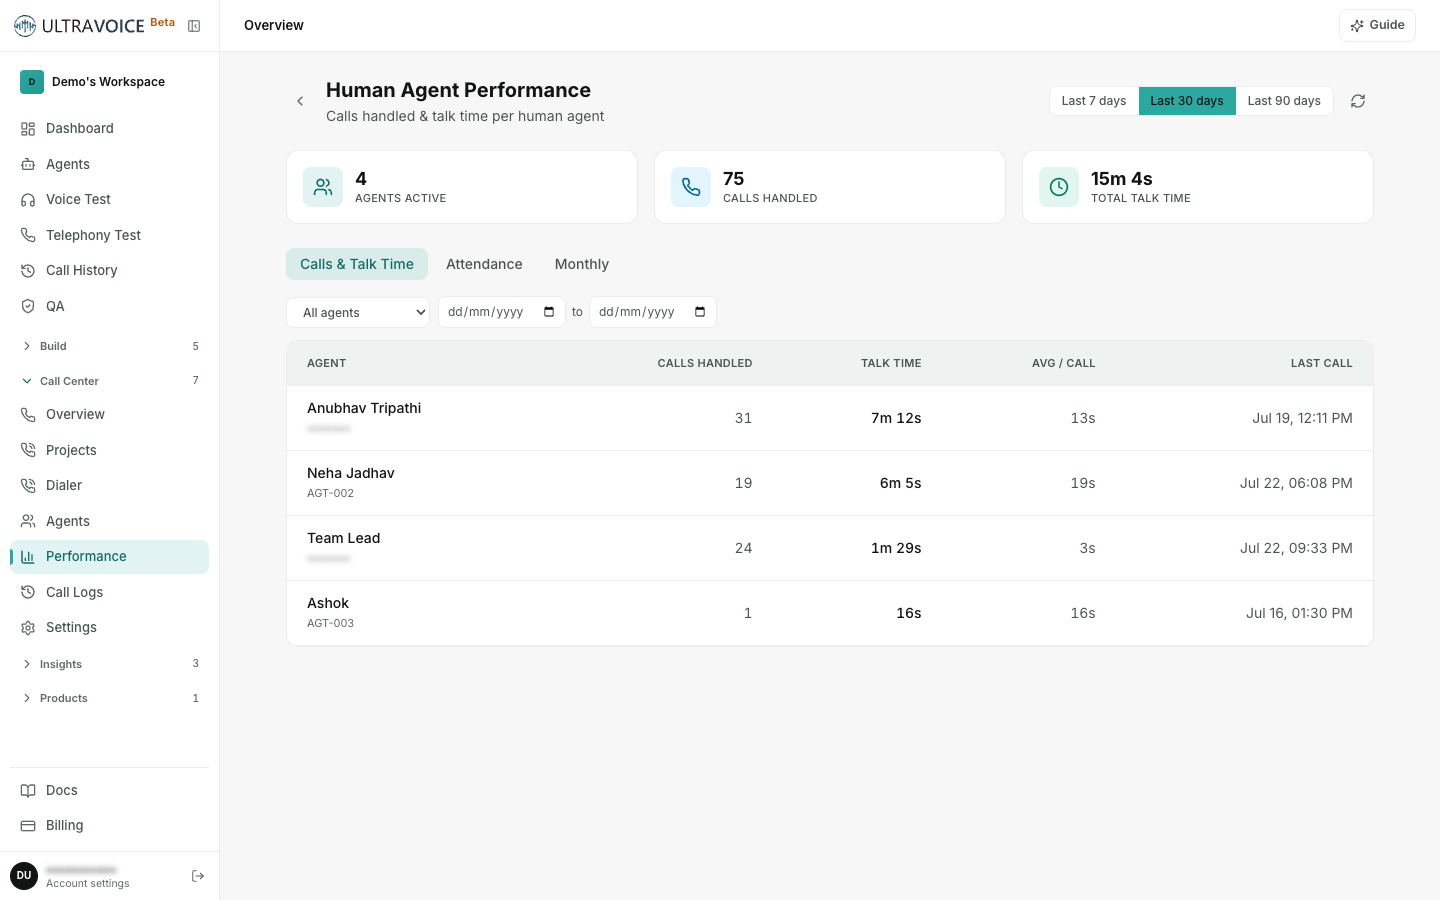
Performance — calls handled and talk time per human agent, by range or month.
-
Settings — your call-center Twilio configuration (see Twilio setup, Option B) and handover options.
Part 6 — The Agent Portal
Human agents and team leaders don't use the main dashboard — they log into the dedicated Agent Portal with their workspace, agent code, and password.
25 · For human agents
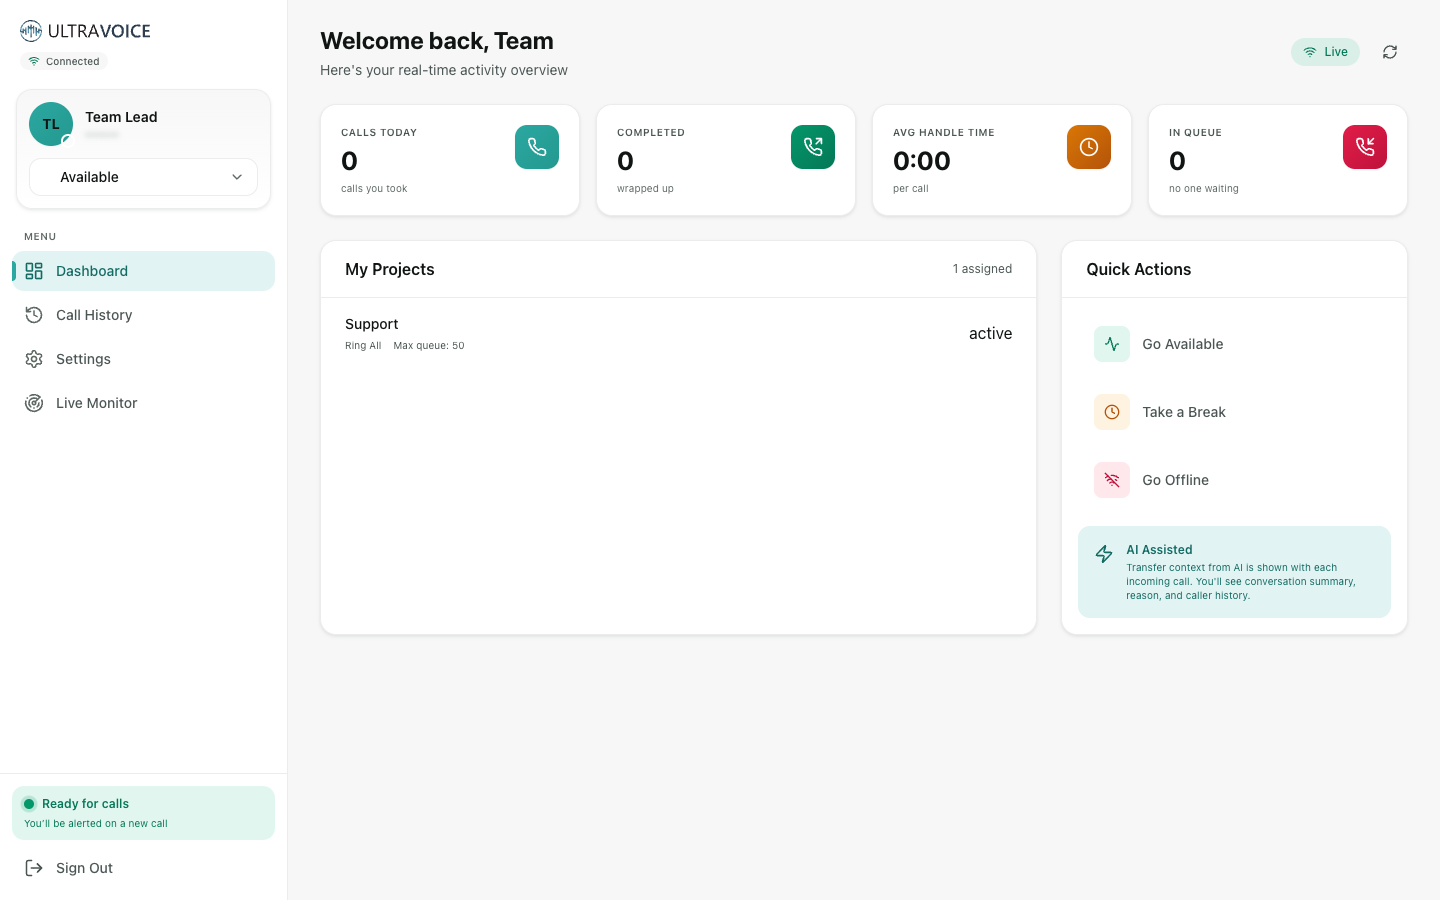
After signing in, an agent sees their real-time home: today's calls, average handle time, who's in the queue, and their assigned projects. A status control (Available / On Break / Offline) controls whether they're eligible to receive calls.
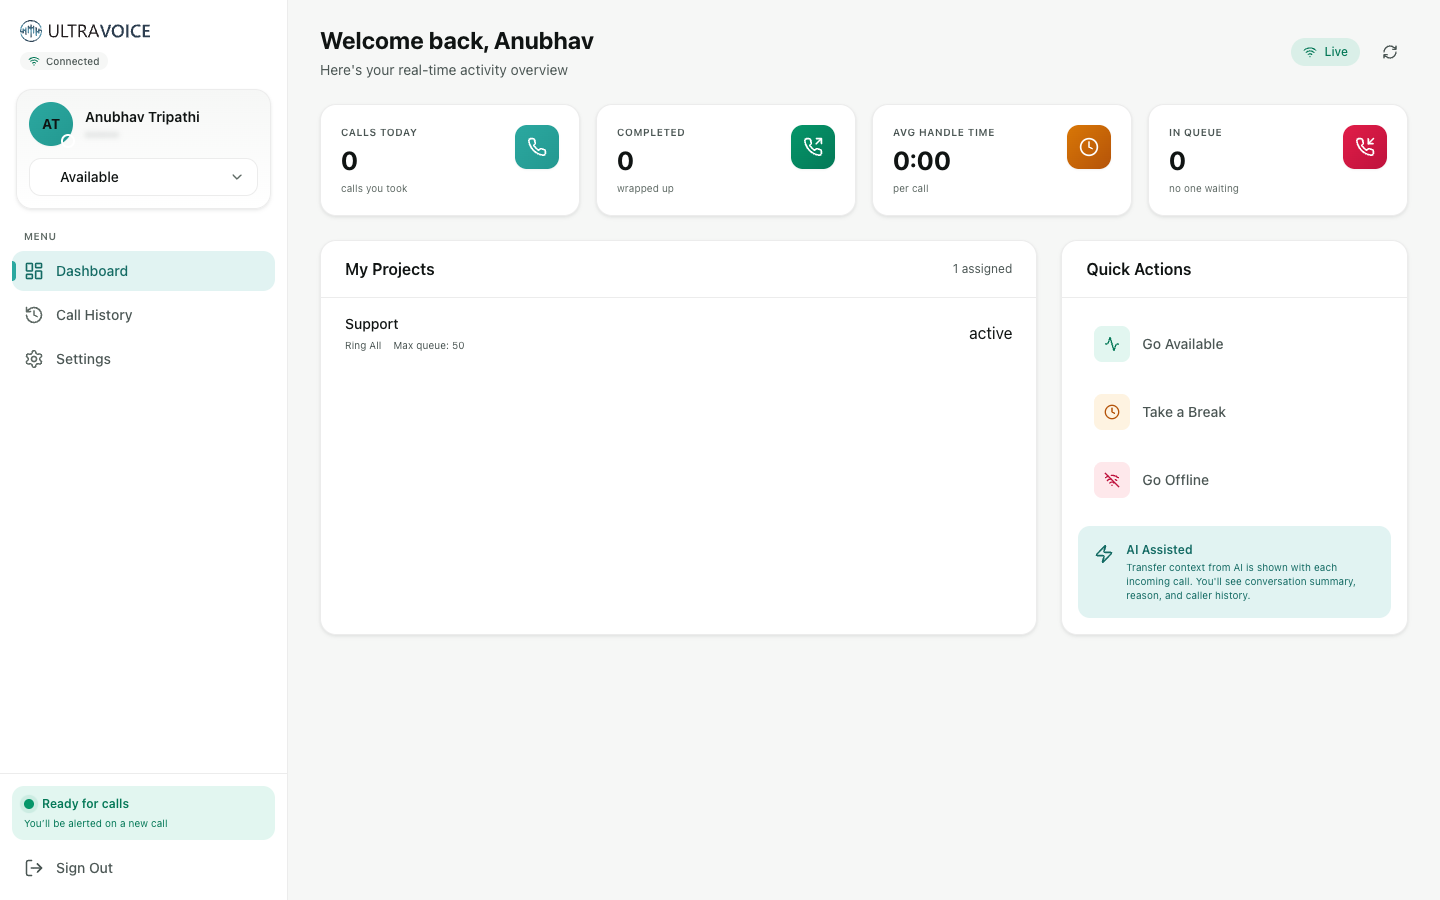
When the AI transfers a call, the agent is rung and sees the AI-assisted context — the conversation so far, the transfer reason, and caller details — then Accept (or Decline). On the live call they can Mute, Hold, End, or Return to AI (hand the caller back to the agent). After the call, they log a Disposition and Notes in the wrap-up panel.
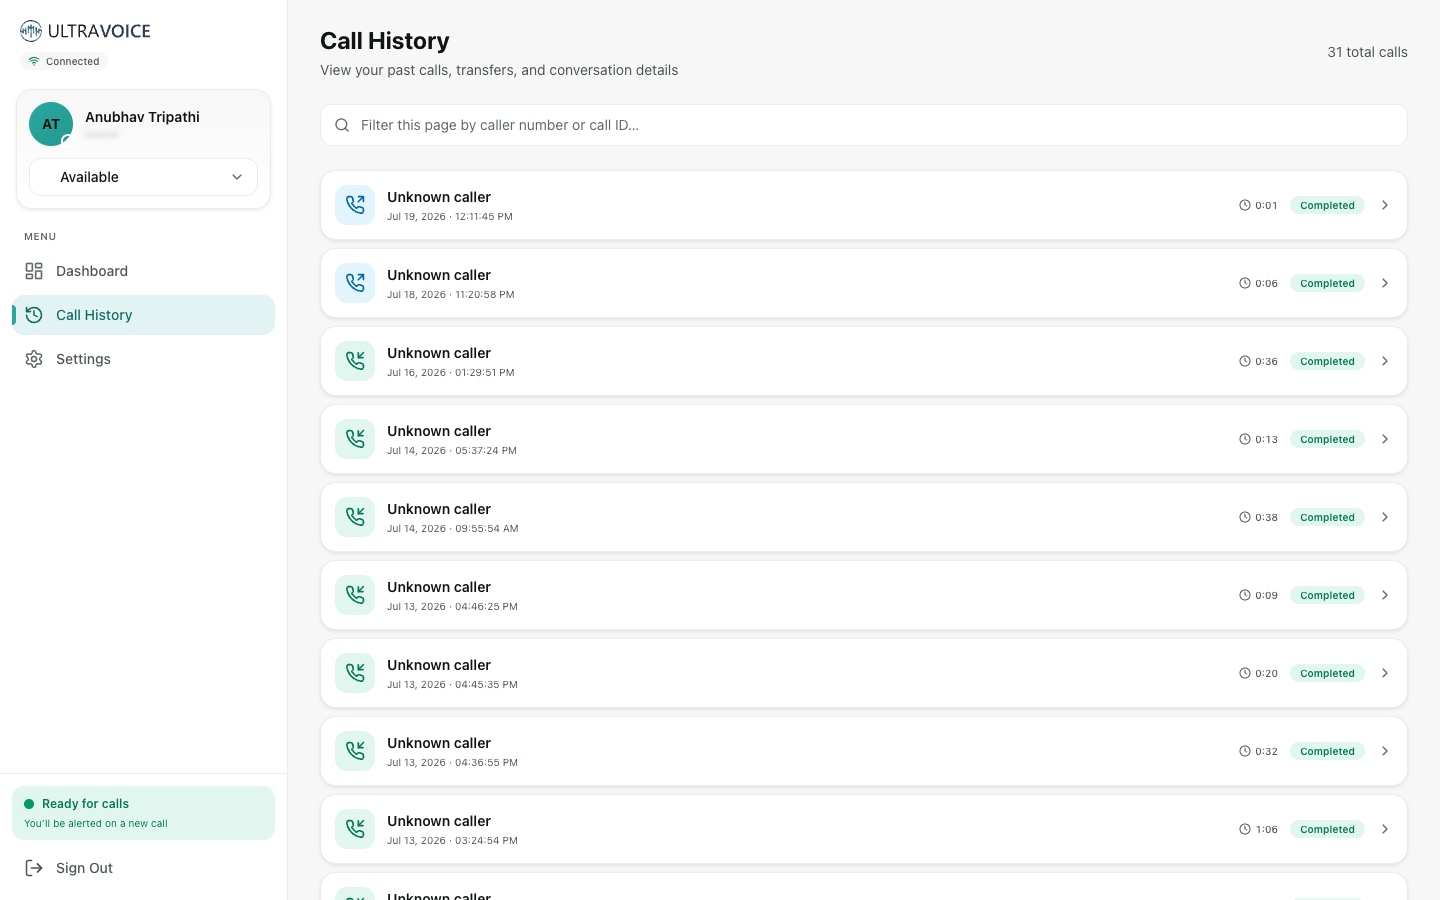
Agents can review their own past calls under Call History…
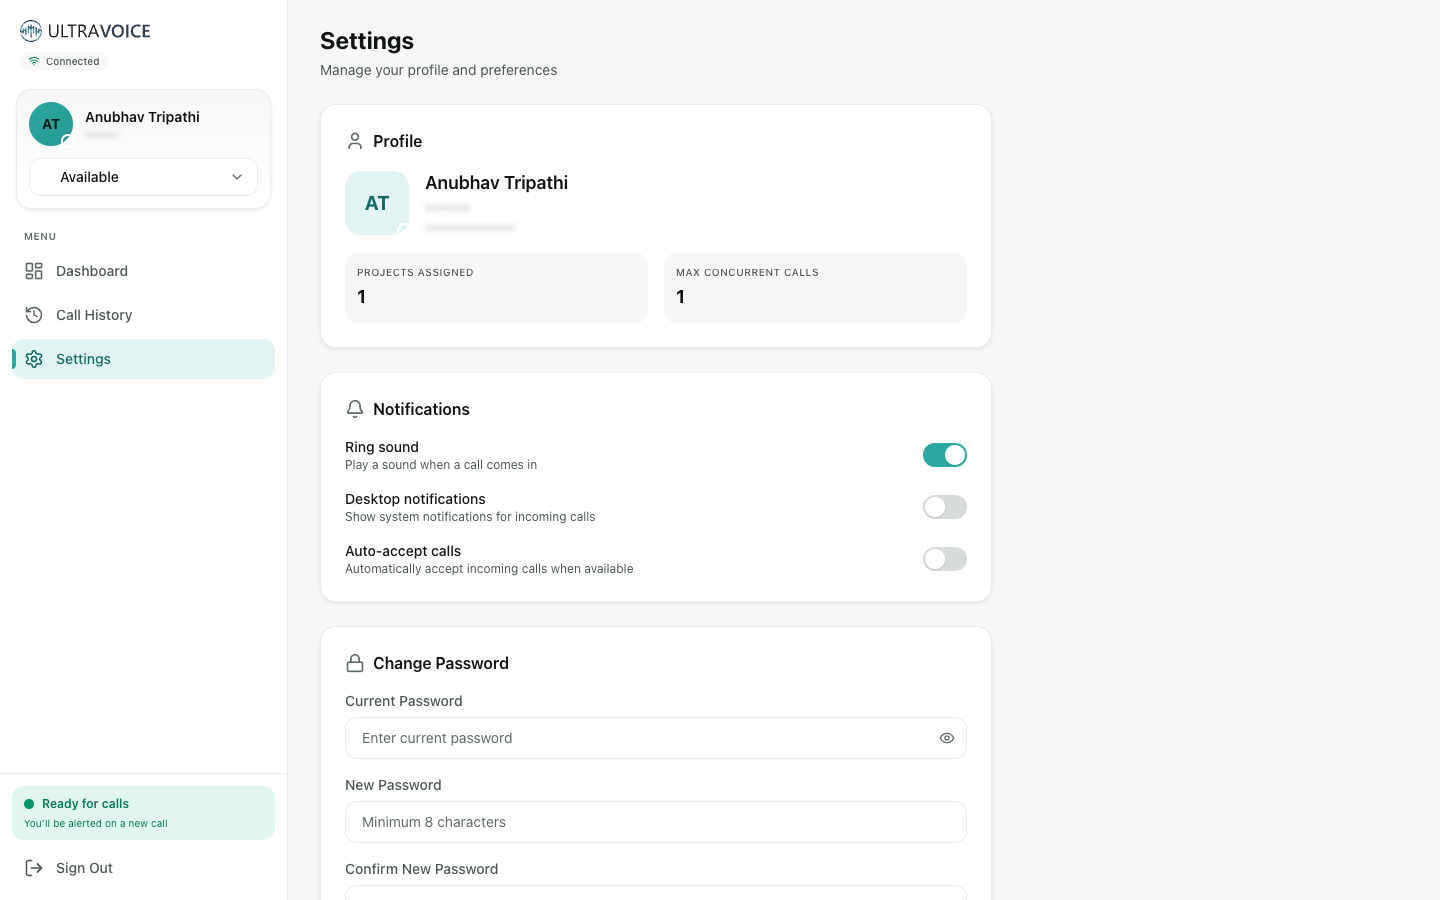
…and manage their profile, password, and notification settings under Settings.
26 · For team leaders — the Live Monitor
A team leader logs into the same portal and gets an extra Live Monitor ("Call Monitor") — a real-time view of every call in their project(s), live calls first, with a rolling summary and checklist progress as each call happens.
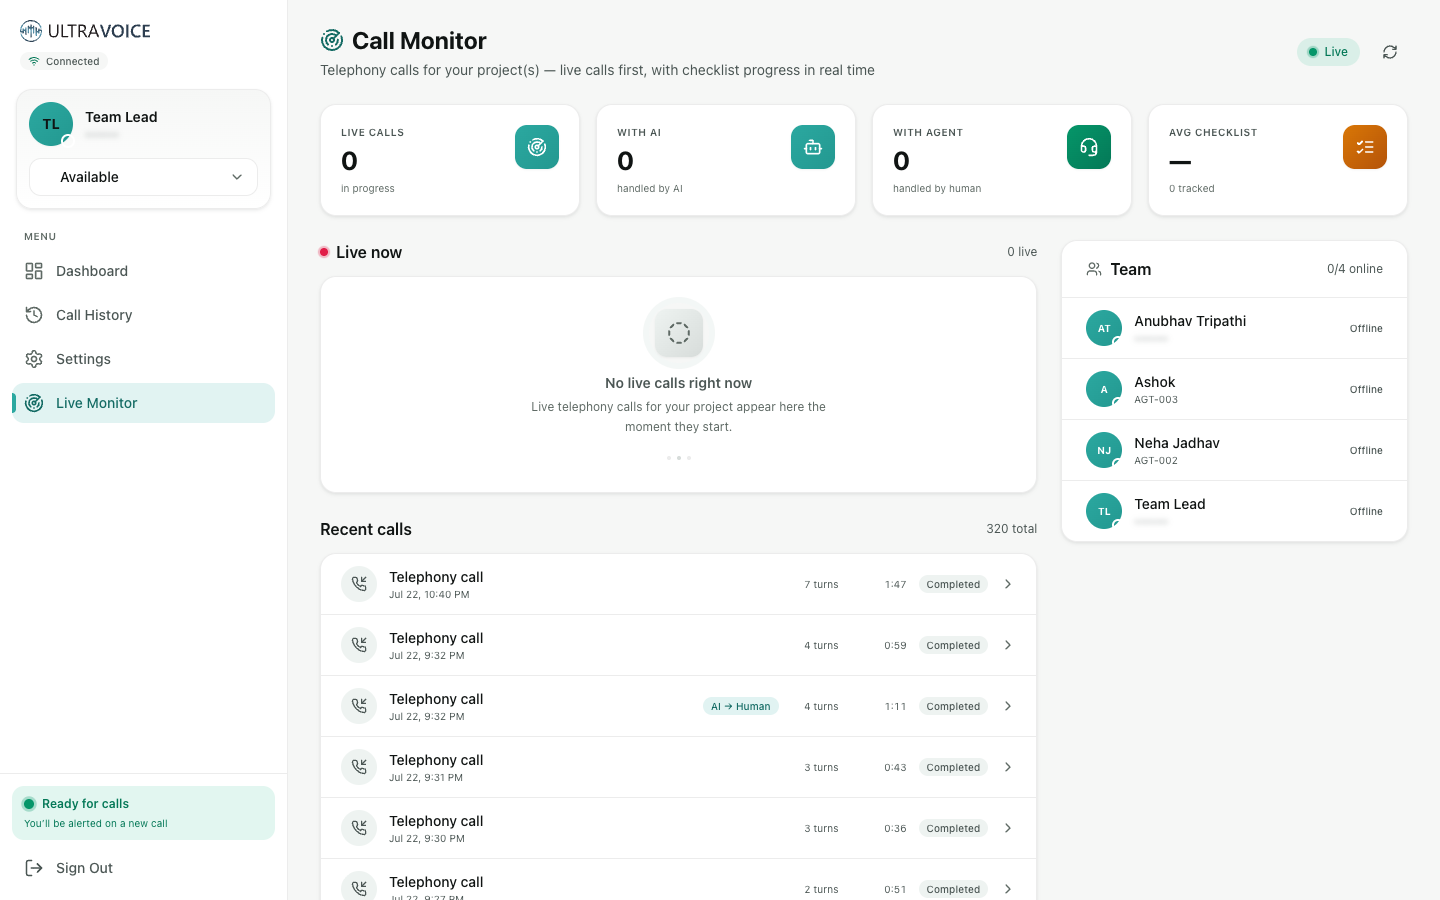
- Top cards — live calls, how many are with the AI vs. a human, and average checklist completion.
- Live now — calls in progress; each row can be Taken (ring the leader's own softphone, removing the AI) or Assigned to a specific agent.
- Recent calls — the full journey (e.g. AI → Human → AI) with duration and status.
- Team — who's online and their current status.
A team leader can also opt into the call rotation with the Take calls switch in their portal Settings.
Part 7 — Monitor & improve
27 · QA — score your calls
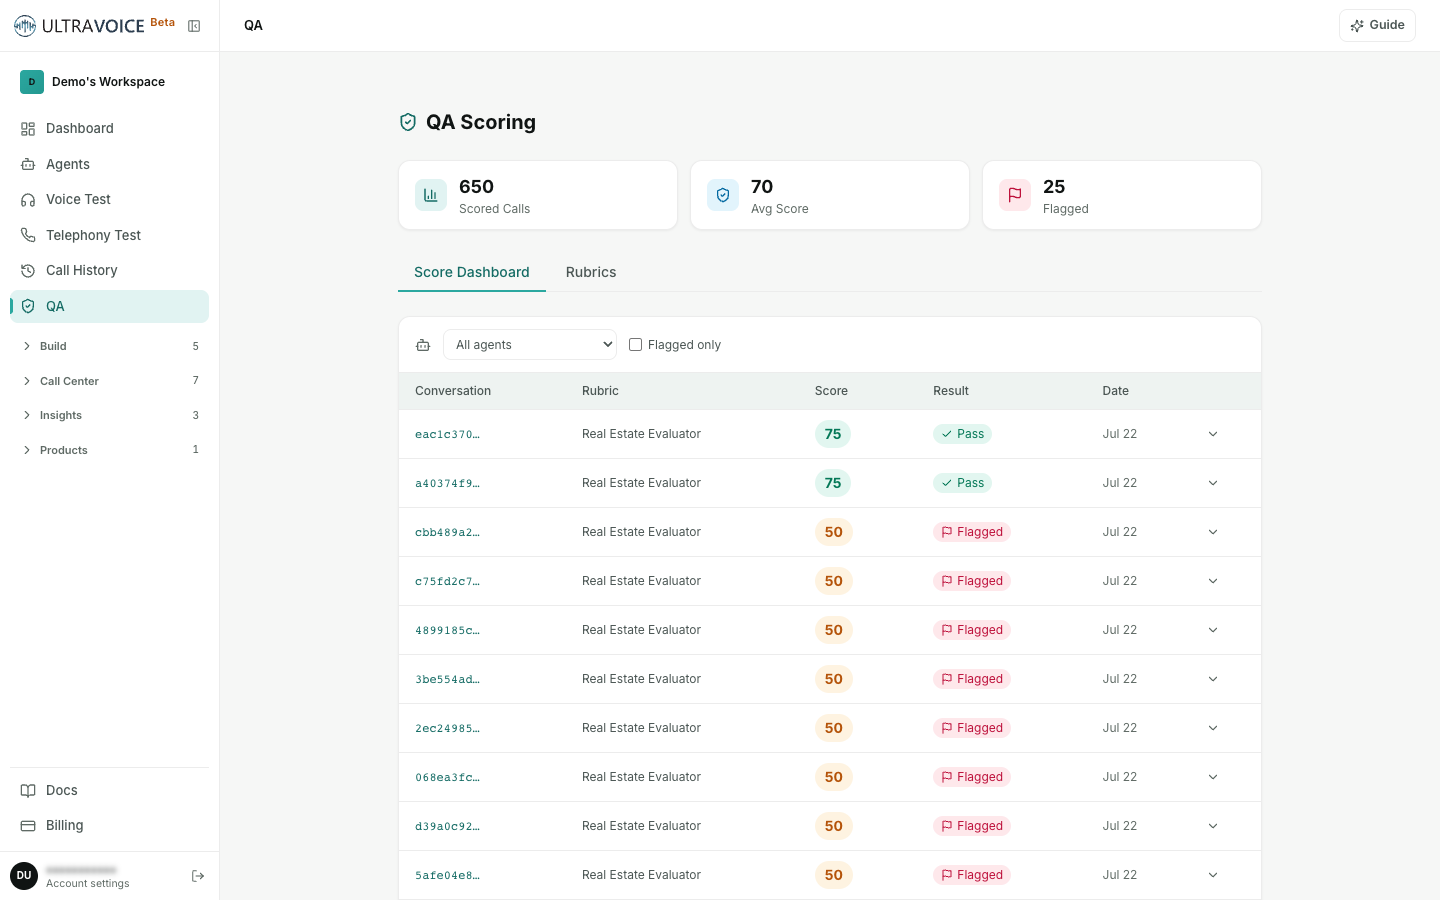
QA (top of the sidebar) automatically grades calls against rubrics you define. Open the Rubrics tab, click New Rubric, and add weighted criteria (greeting, accuracy, empathy, compliance…). The Score Dashboard then shows scored calls, average score, and flagged calls.
28 · Call History
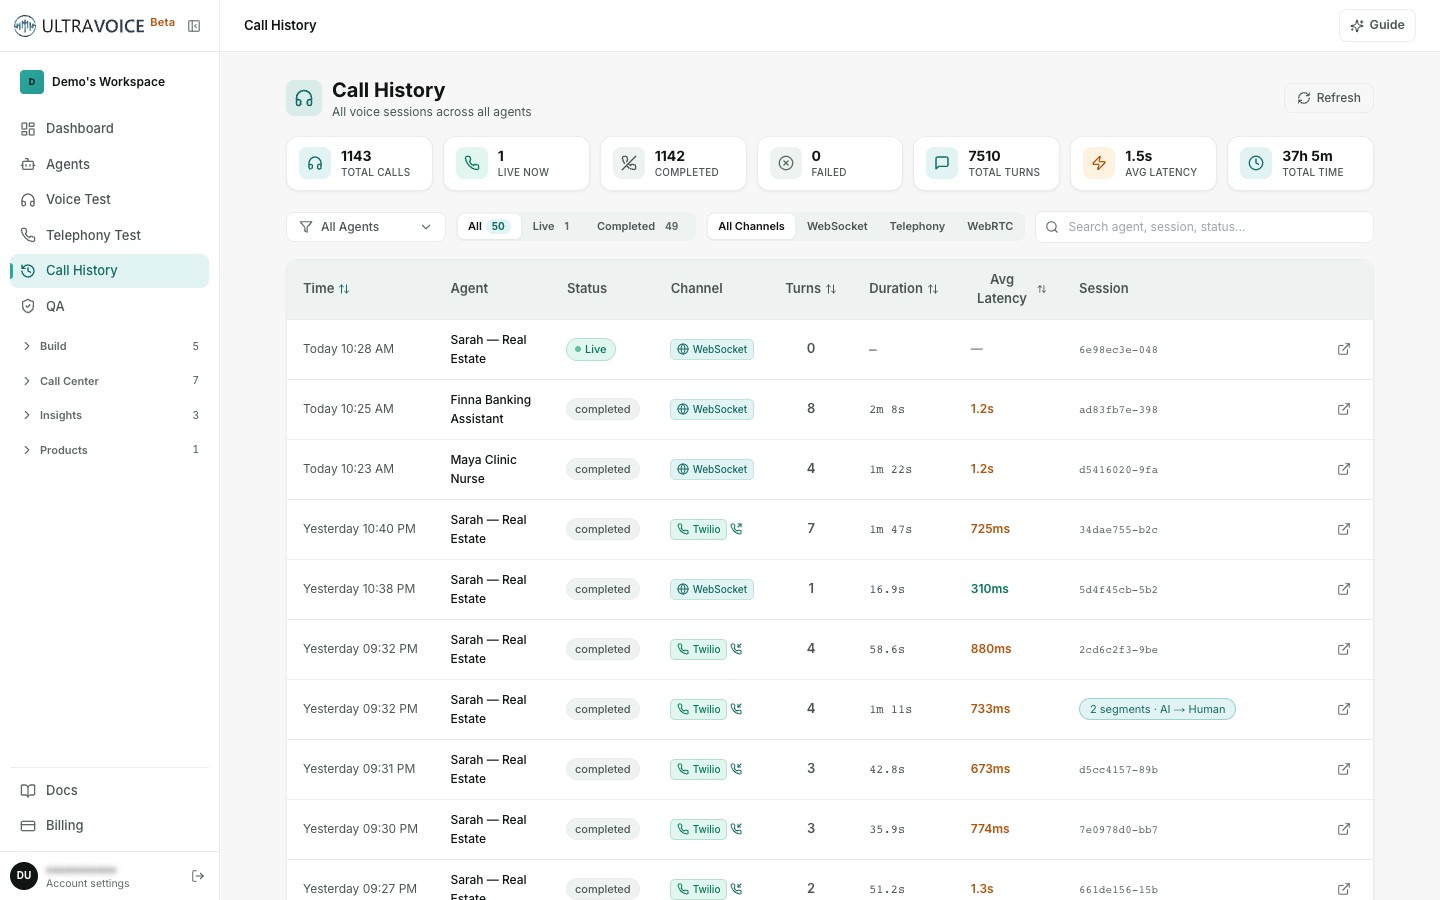
Call History lists every voice session across all agents, with status, channel, duration, and a click-through to the full transcript, summary, and QA score for each call.
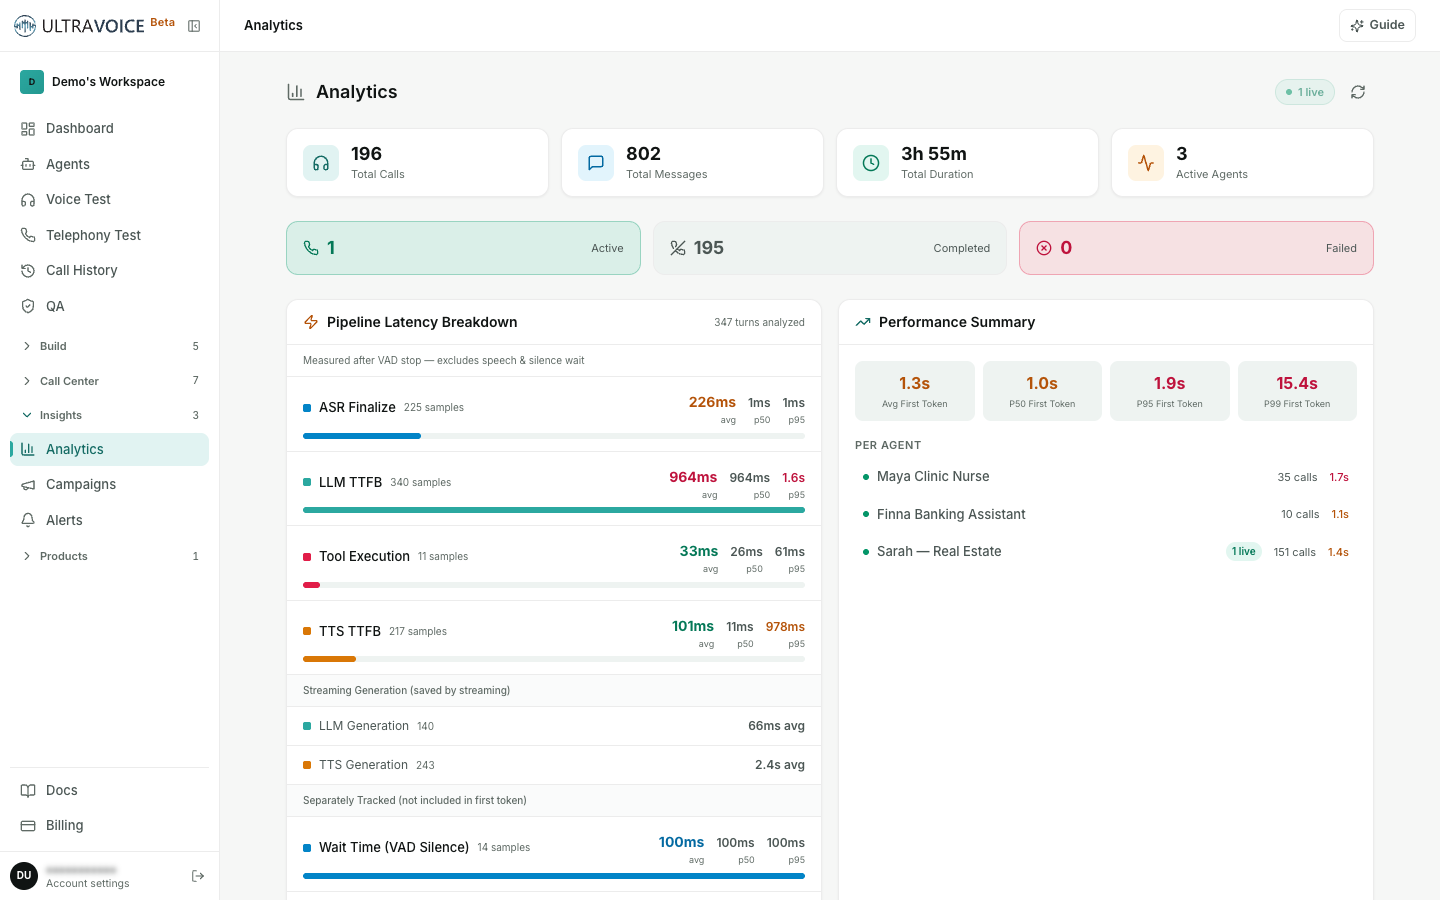
29 · Analytics
Insights → Analytics charts your call volume, latency, provider health, and tool usage over time, with a live-call indicator.
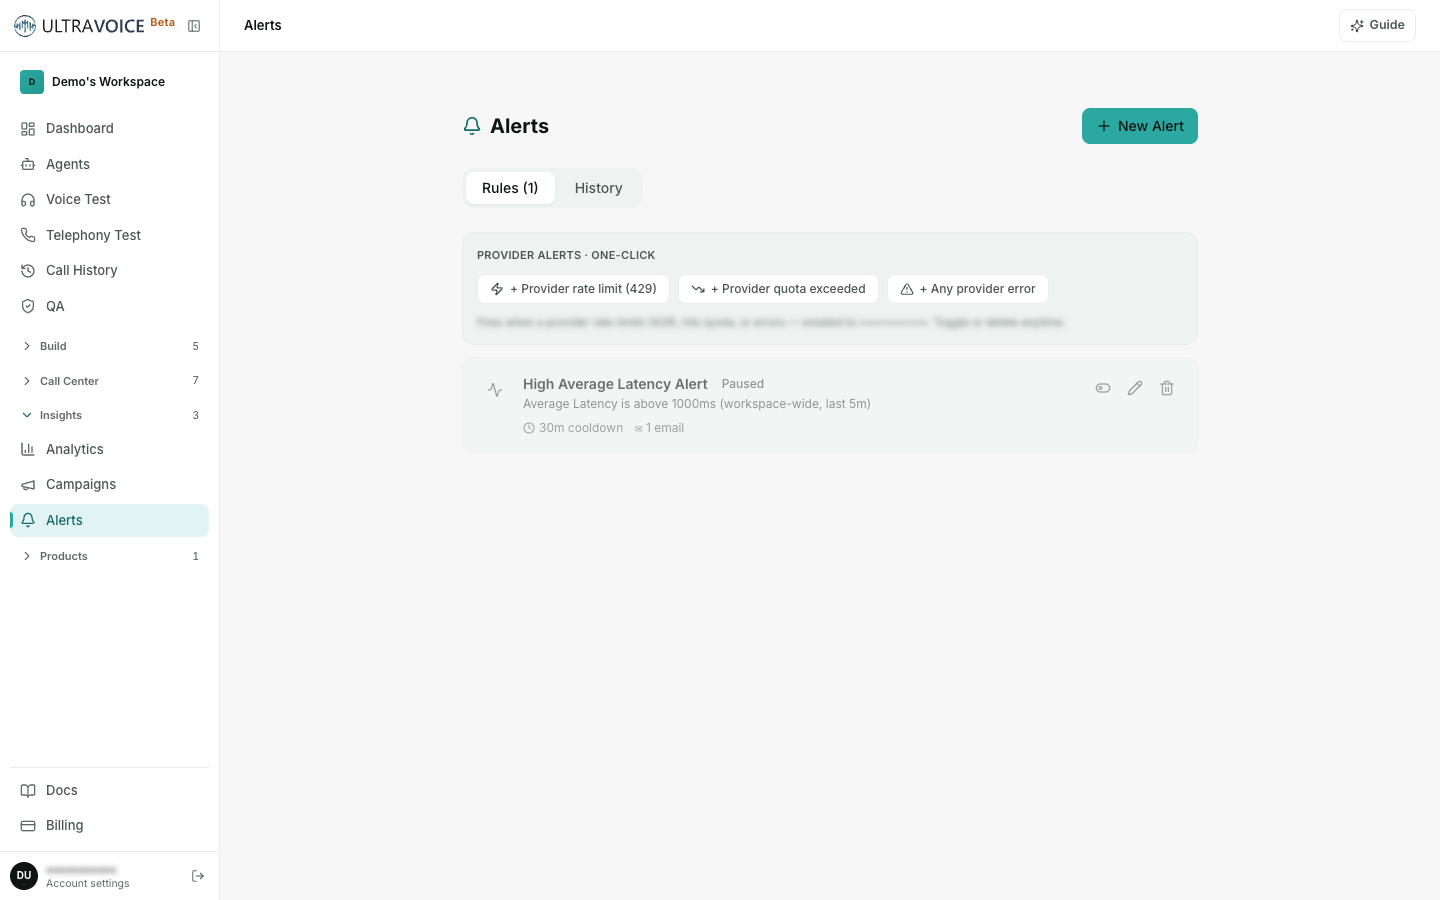
30 · Alerts
Insights → Alerts lets you create alert rules (e.g. notify me when a provider errors, or when a call is flagged) and review a history of what fired. Create one with New Alert.
Billing & wallet
UltraVoice uses a simple prepaid wallet — live voice and telephony calls draw from it, billed by the second. Building agents, editing prompts, and running text simulations are free. Top up any time with a card from Billing; every top-up generates a receipt.
🎉 That's the whole tour. Create an agent, give it providers and knowledge, publish it, test it in the browser, connect a Twilio number, and — when you're ready for humans in the loop — set up a Call Center project, add agents, and watch it all live from the Team Leader monitor.